Digital Photography 202: Close Up, Macro & Micro
©Brooke Clarke 2011
Background
Optics
Flange Focal Distance
Add On Close Up Lens
Reversed Lens
Nikon-F
to 52 mm Reverse Adapter
MC7 2X
Teleconverter
PK-13 27.5
mm Extension Ring
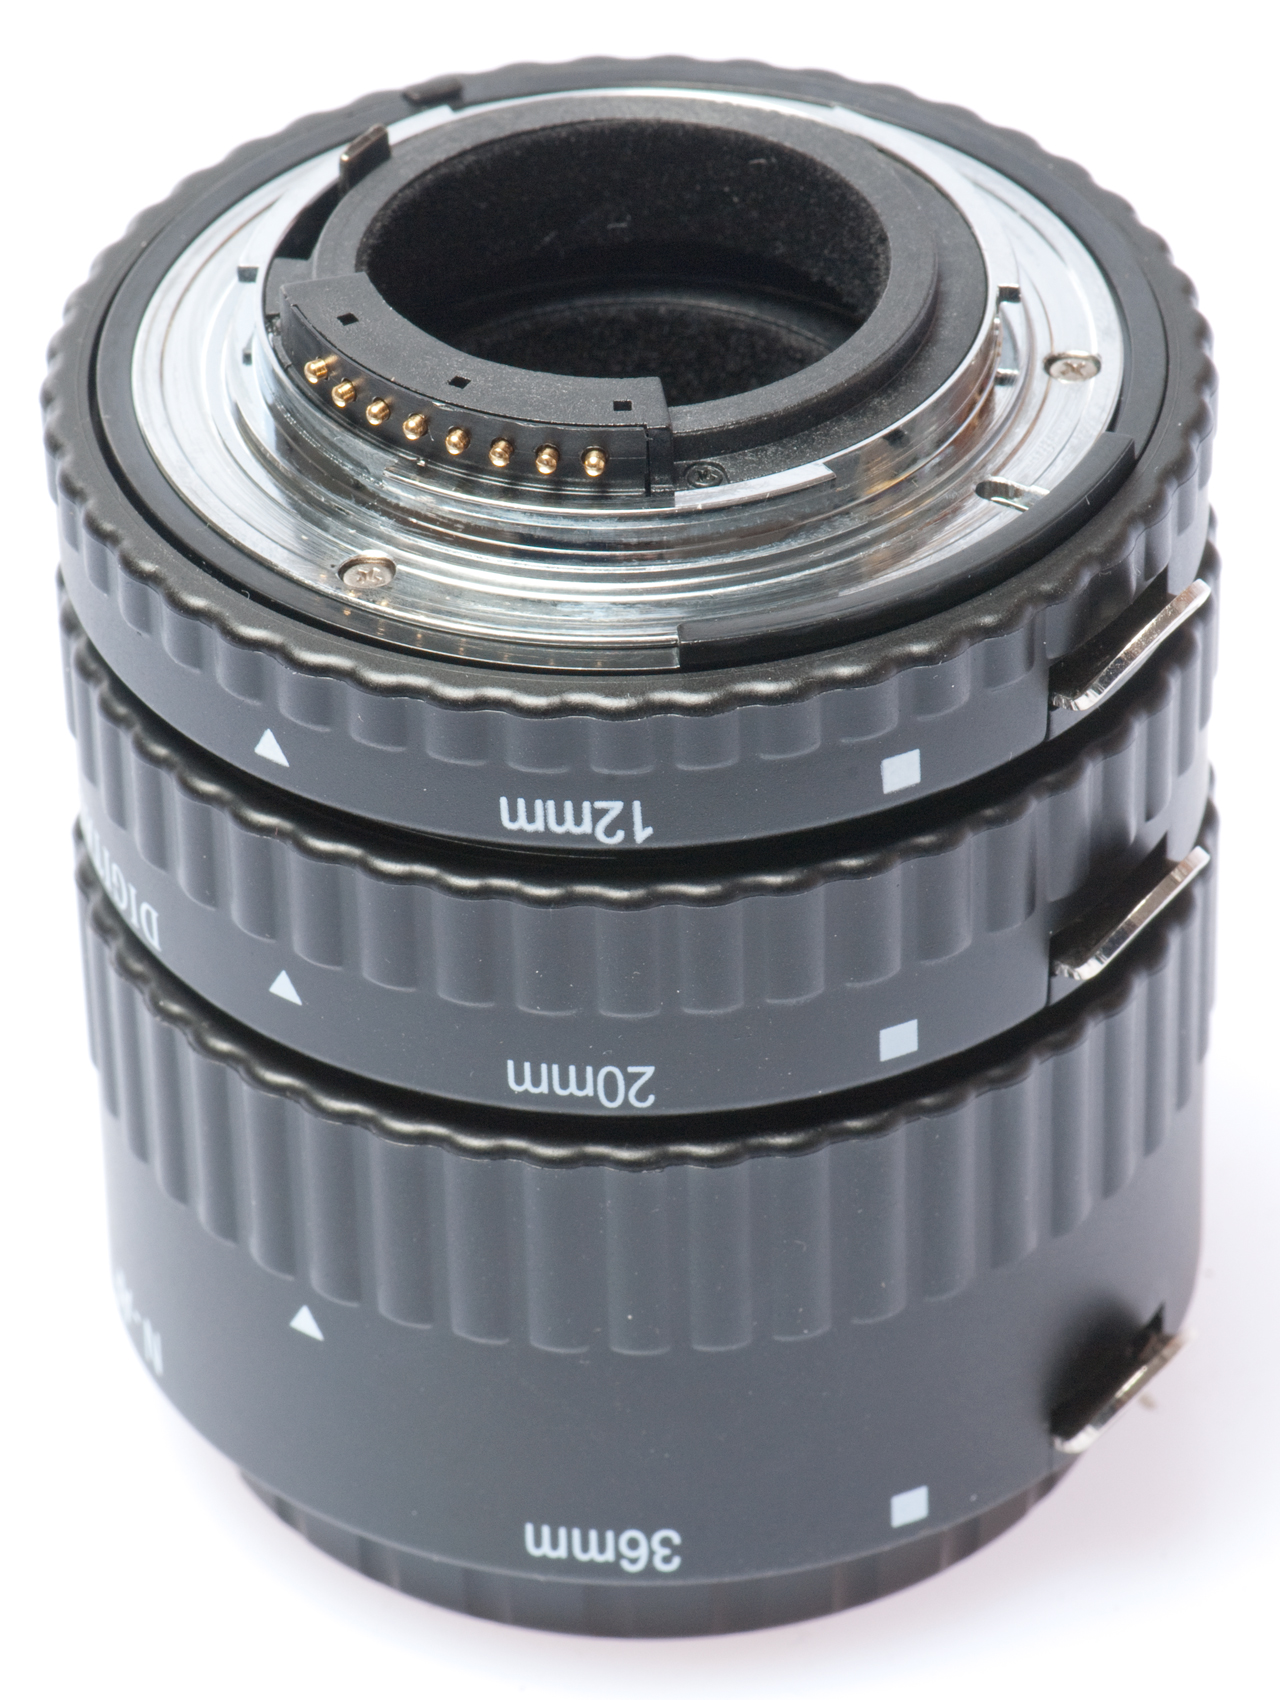
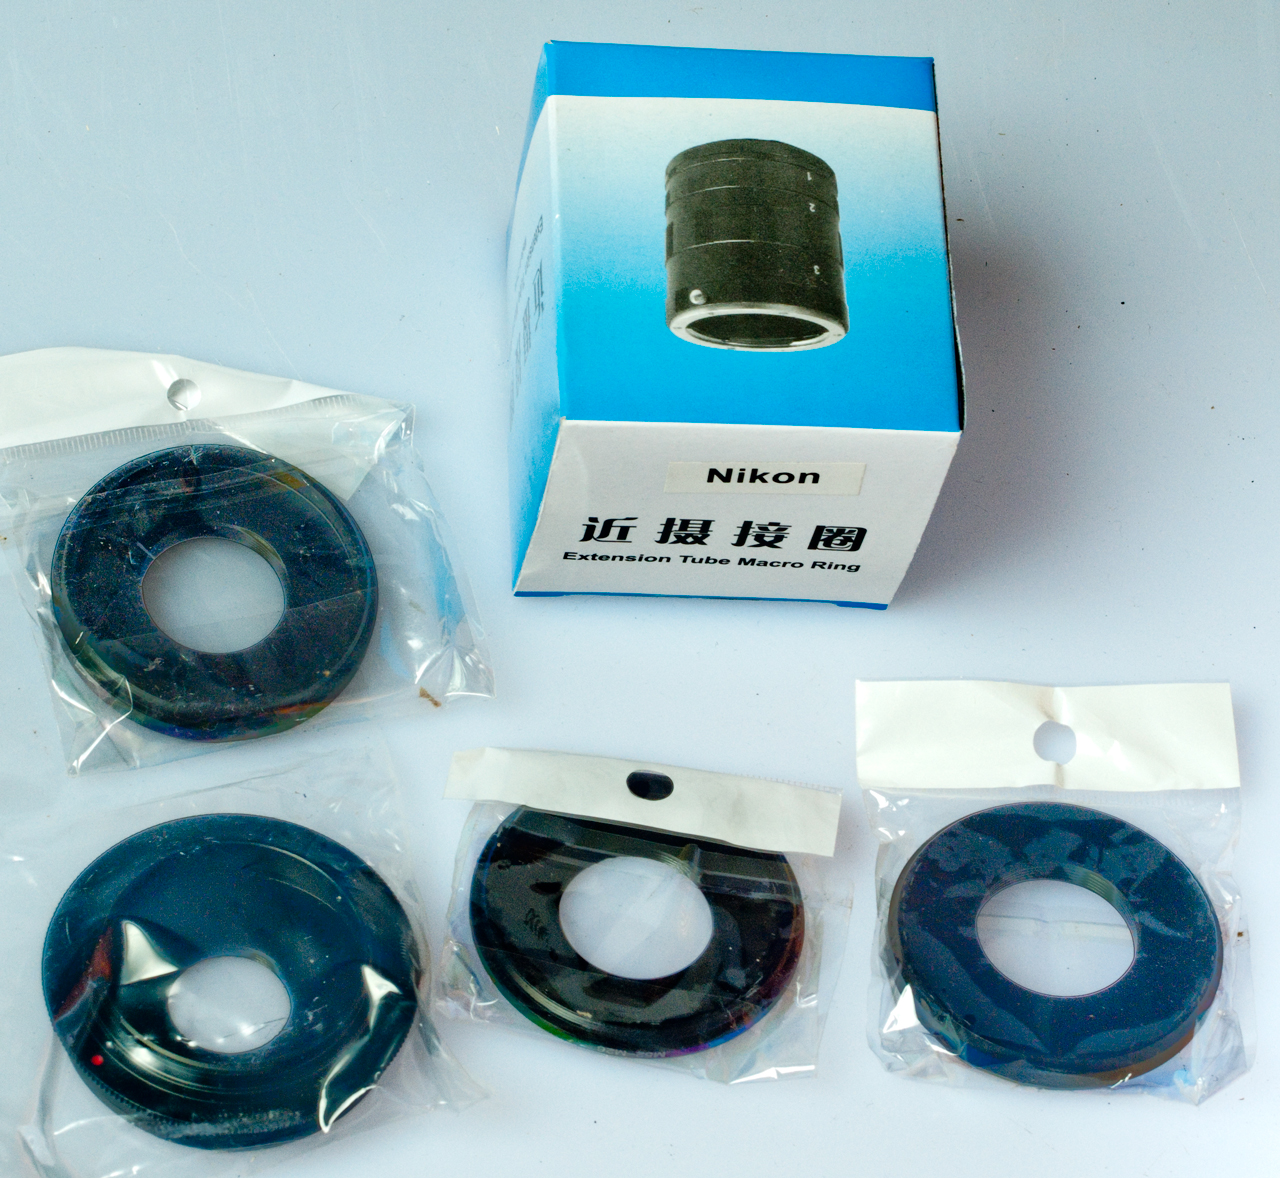
Nikon
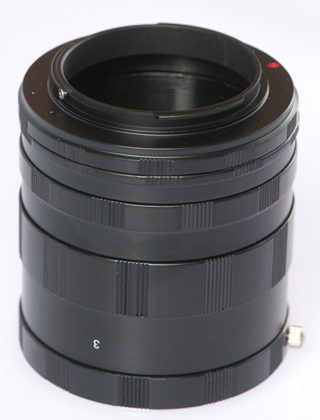
Extension Ring Set
Digital
Extension Ring Set
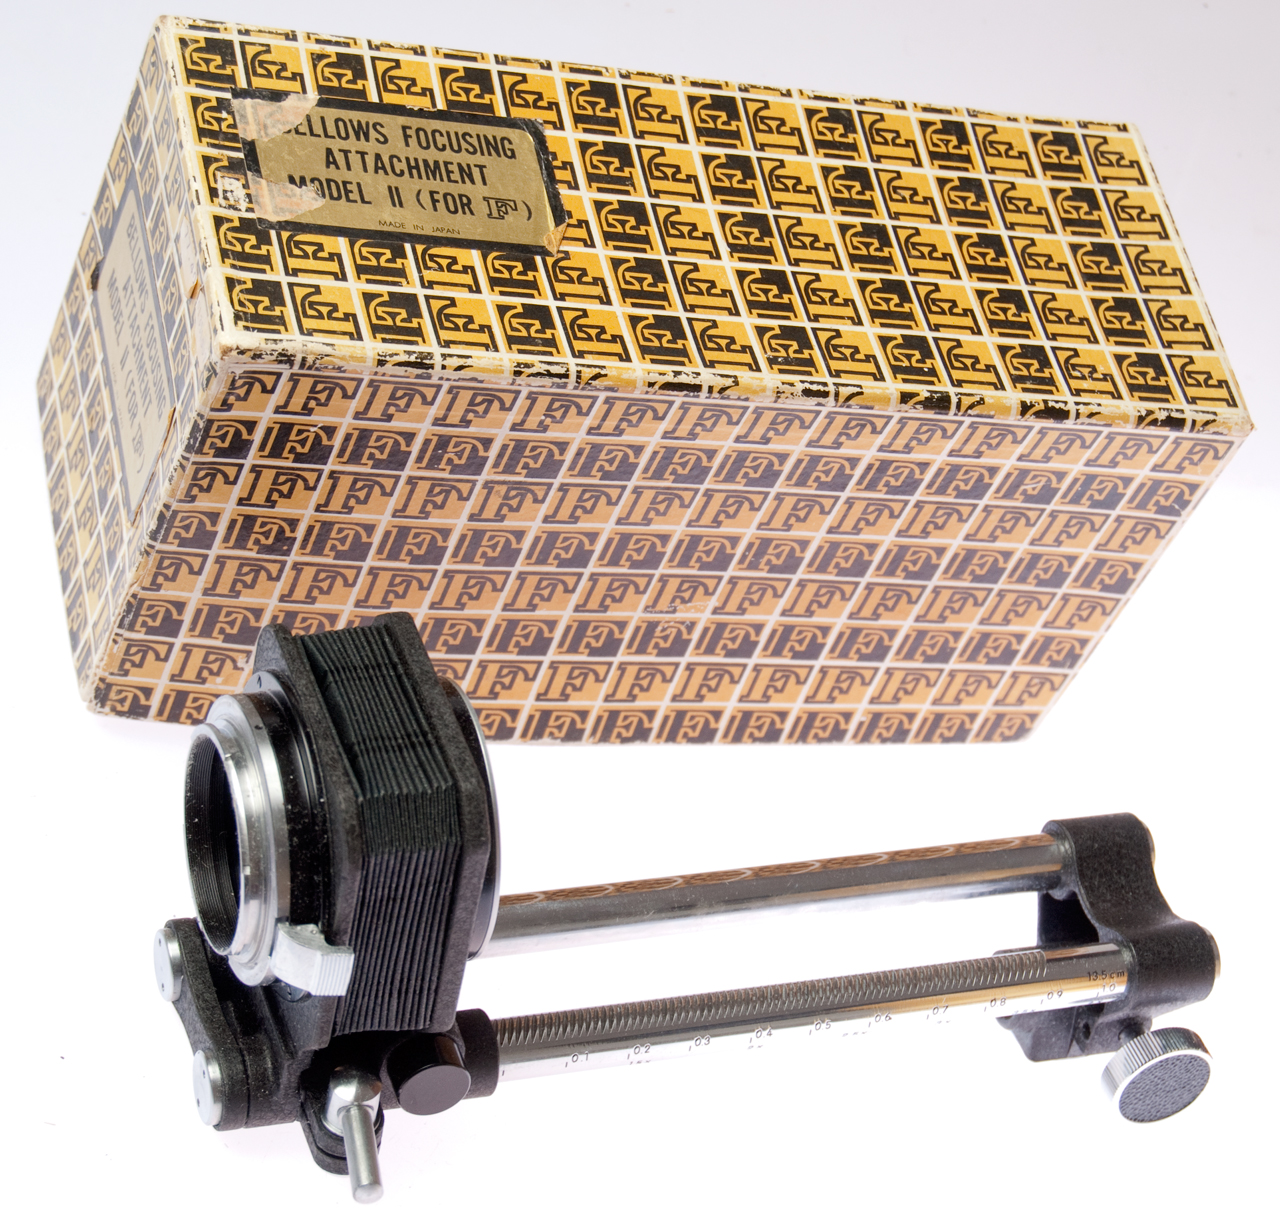
Bellows
Set of
Adapters
Macro Lens
Microscope Lens
C/CS Mount TV Lens
Optical Theory
Depth of Field Calculator
Choosing f/Stop
Focal Length
Magnification
Extension Calculations
Hardware
StackShot
Examples
Real 2011 U.S. Silver Dollar
Fake 1865 & 1875 U.S.
Silver Dollar
Battery Power
Software
Related
Links
Background
By far the most common subject of
photography are humans. But there are occasions when you
want a photograph of something much smaller. Since most
cameras are designed for taking photos of people they are not
capable of close up photography. How close you can get
depends on the camera design mainly in terms of what accessories
it can utilize.
My motivation is to be able to take photos of insects and other
things that are in the 1/4" size range and use
focus
stacking to make the final images.
Film and digital cameras share a common need and that's to
have the subject come close to filling the frame. Because of
limited resolution ( grain in flim, pixels in a digiral camera)
there will be more detail when the subject comes close to filling
the frame. If for example you take a photograph of a fly and
it's less than one tenth the length of the imaging device and one
tenth of the height of the imaging device then you have only used
a hundredth of the avaliable pixels. It's like changing a 10
M Pixel camera into a 1 MPixel camera and that's much too large a
hit on image quality. So for these small things some from of
optical magnification is needed.
Macro Photography (
Wiki)
typically relates to magnifications near 1:1 subject:image
size. When these images are printed the print is many times
larger than the subject.
A photograph taken through a microscope is called a Micrograph (
Wiki).
Below I'm only addressing conventional light microscope imaging,
but there are many sophisticated ways of taking a photograph with
various specialized microscopes that involve things like phase
contrast, using one color of light to illuminate the subject but
taking the photograph at a different wavelength (think CSI), or
using electrons instead of light, etc.
When stacking images it's important that the pixels can be
aligned. It's my understanding that the automatic image
alignment feature works by using translation (X & Y movements)
as well as rotation to align the images to be stacked. It
does not include changing the magnification of the image.
That's why the camera needs to be in manual focus mode and the
focus should not be changed since that changes the
magnification. In a similar way the aperture (f/number)
should not be changed. Since it's desirable that the
exposure be the same for all shots in a stack the shutter speed
should not be changed.
Optics
The following optical options are
more or less in order from lowest cost to more expensive.
For a premium lens where it's diffraction limited the resolution
is proportional to the f/number.
Add On Close Up Lens
These come in different strengths
(Wiki:
dioptre)and
look like filters. They need to be purchased to match the
filter thread on your lens.
dioptre = (1 meter) / (focal length of lens)
Dioptre is also used for reading glasses and for correcting the
eyepiece on binoculars, cameras, telescopes, etc.
Magnification = (F.L. of camera
lens) * Dioptre / (1 meter)
For example a 50mm Focal Length lens woud be called a 20 Dioptre
or 20D (maybe marked 20X).
Reading glasses typically are in the 1D to 2D range (marked +1.0
or +2.0), although you can get other and higher powers off the
rack in durgstores.
You can think of the diopter number like a multiplier so a 4D CU
lens is twice as much magnification as a 2D CU lens.
Also note that the location of infinity focus changes from
infinity to the focal length of the add on lens.
Instead of using a simple filter
type lens, any camera lens can be used the same way and has the
same magnification effect. This requires using a Male-Male
Macro Coupler Reverse Adapter (typically a few dollars
each). Note that two thread sizes need to be
specified. In my case 52mm to 52mm, 62mm to 62mm and they
didn't have 52mm to 62mm (which can also be used as a 62mm to
52mm). The add on lens must have it's f/stop set to full
open.
Magic eBay Search Phrase: 52mm Nikon Macro Coupler
Reversed Lens
Reverse Lens Adapter Ring
The idea is to mount a lens so it's turned end for
end. This requires a Macro Reverse Adapter
Ring. Note you need to specify the camera body
lens mount (Nikon F) and the filter thread size of the
lens (52mm for one ring and 62mm for another
ring). These are typically a few dollars each.
Magic eBay Search Phrase: Nikon F reverse
52mm
A couple of things happen when this is done.
First, most modern camera lenses are designed with the
idea that you are going to be taking a photo of some
human scale subject and focusing that image on a small
(about an inch) image sensor. So when you reverse
the lens and are taking a photo of something that's
smaller than the imaging chip the lens will work in a
way that's closer to it's design size ratio.
Second, multi-elements lenses typically do not have
their center of focus at the mechanical front to back
center. So when reversing the lens the subject
focusing range will be very different than it was with
the lens mounted in the normal way.
By using extension tubes that have male and female
threads on each end that match the lens filter threads
the reversed lens can be moved away from the camera
body. This shortens the subject focus distance,
i.e. increases the magnification.
Another way to move the lens further away from the
camera body is to use a bellows.
Note that the lens that's reversed does not need to be
one that would fit your camera body. It can be any
lens that can be mounted. For example by using a
series of adapters you could use a movie camera/TV
camera C-mount lens (reversed).
|
Nikon-F to 52 mm Reverse
Adapter
|
|
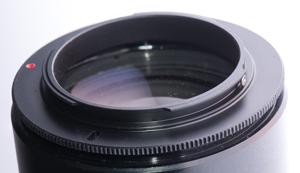
|
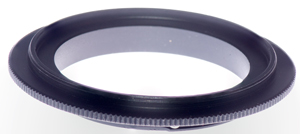
|
Reversed Nikon 105 mm Lens
Example
Notice that the hole in the adapter ring is smaller in
diameter than the lens.
|
|
Close-Up Photography
using Reversed Lens Nikon-F - 52mm Filter Thread
The front of the lens (shown above) has the adapter
screwed onto it's 52mm
filter threads. The Nikon-F bayonet mates to the
camera body.
Note the hole in the adapter is smaller than the front
lens diameter, so
there's some light loss.
|
52mm threads on top and
Nikon-F male on bottom
|
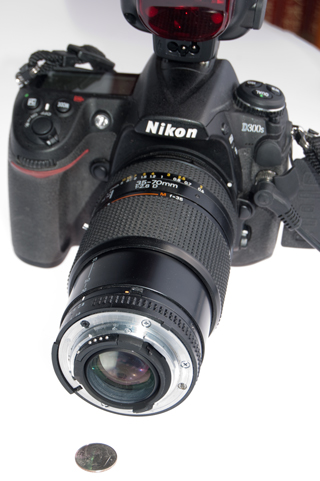
|
|
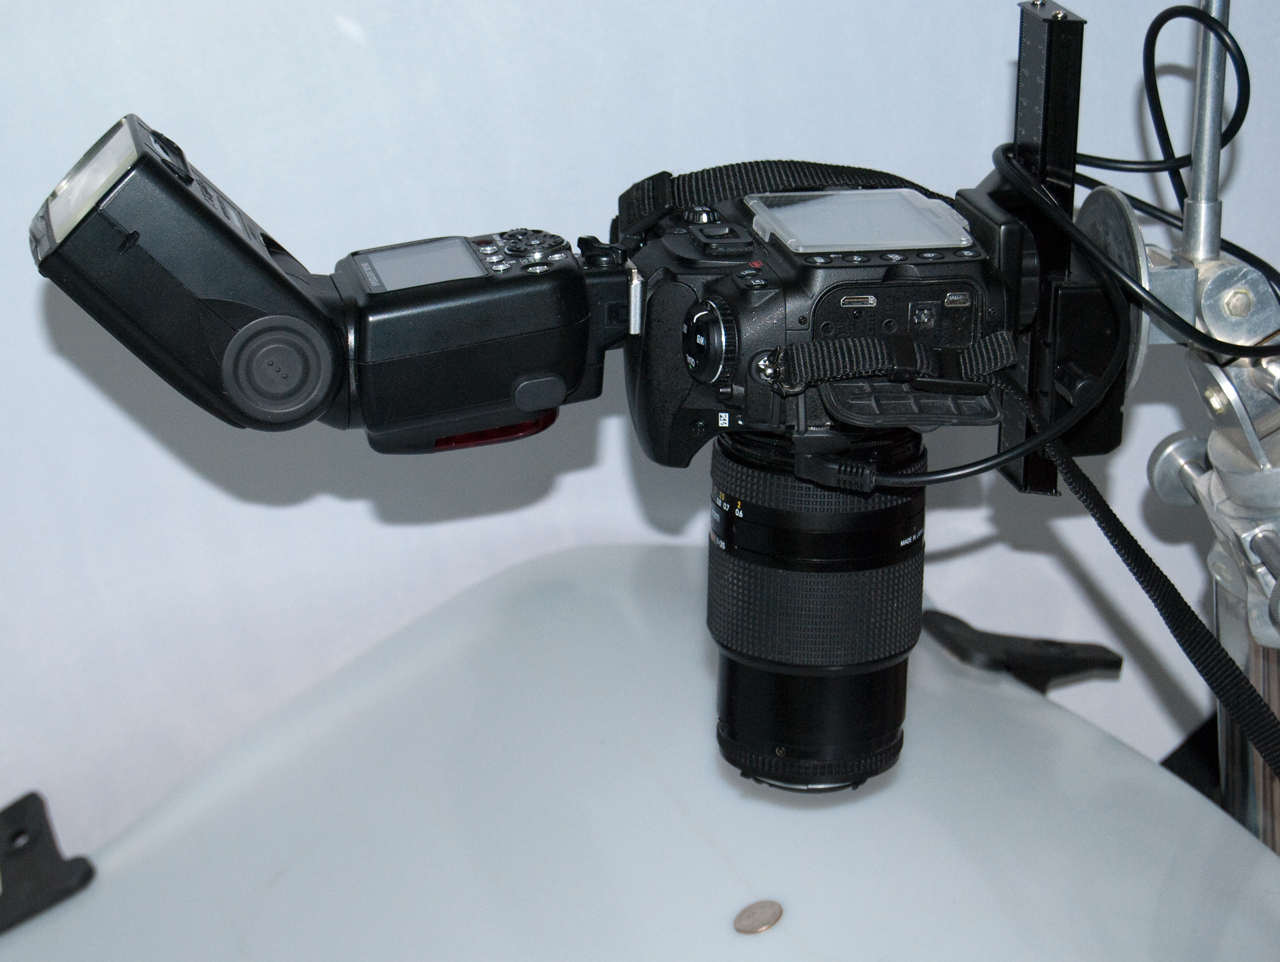
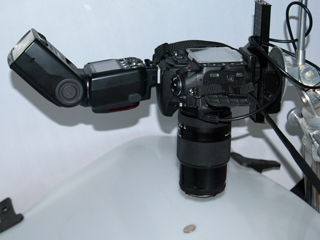
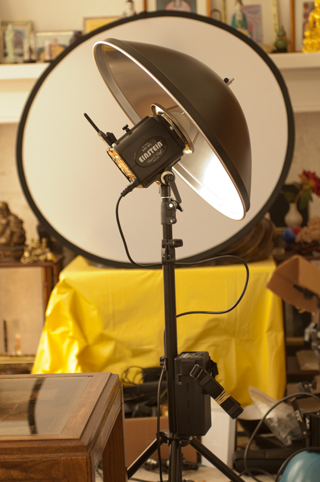
Niikon D300s cameera,
Lens Reverse adapter Ring 62mm, Nikon 35-70mm Lens,
SB-900 flash
|
Close Up Setup: Nikon
D300s, Lens Reversing Adapter 62mm, 35-70mm Lens, Focus
Rack, Tiltal Tripod, SB-900 flash
|

|
|
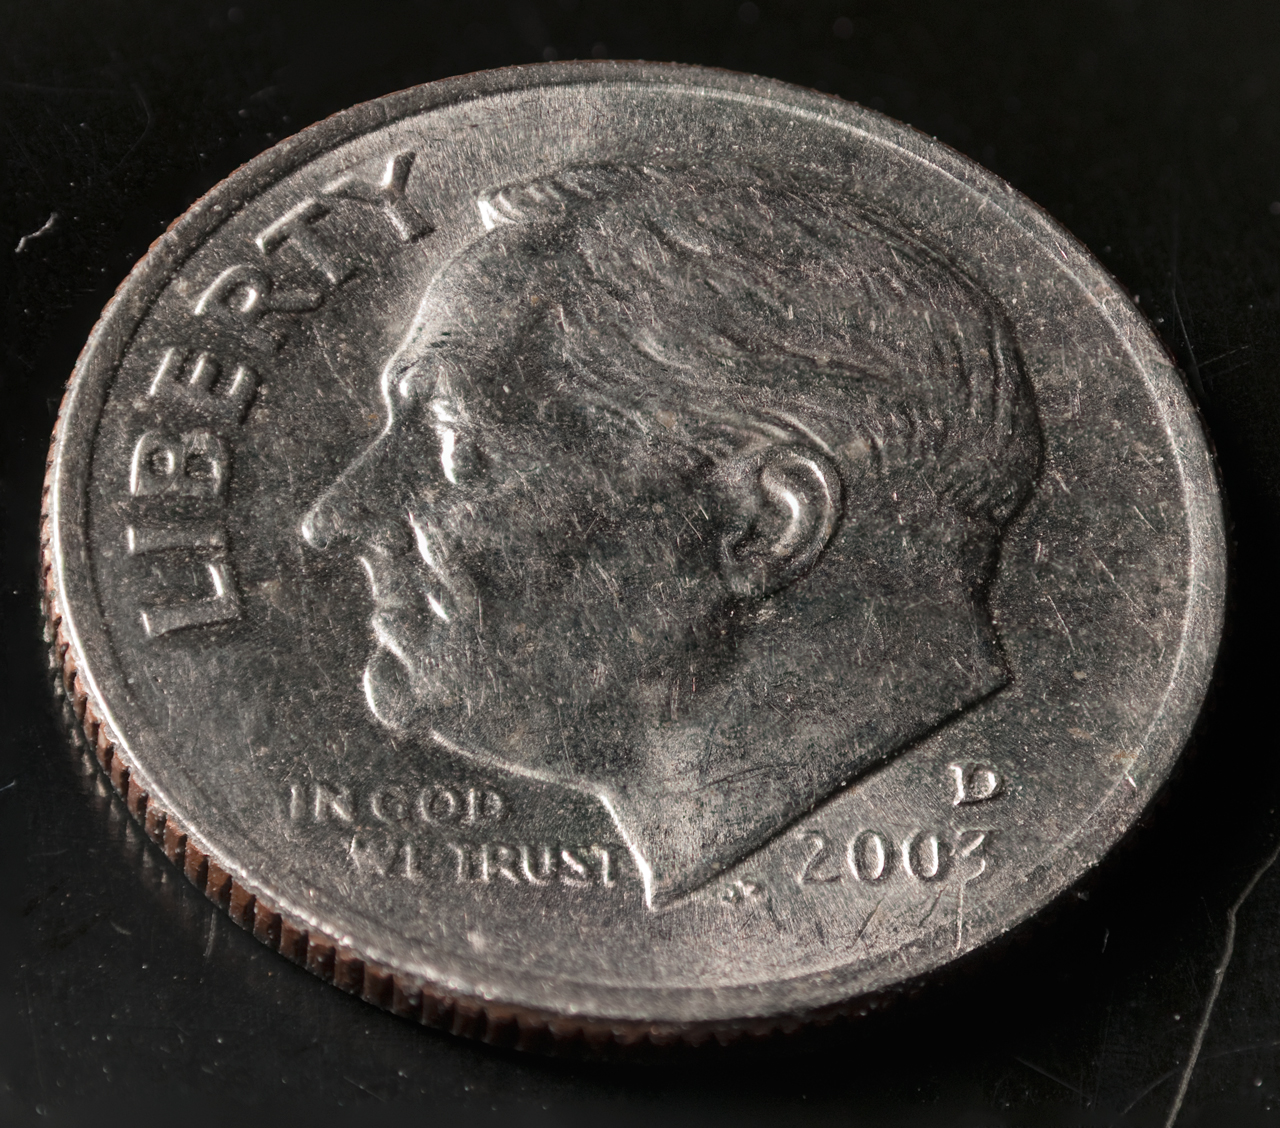
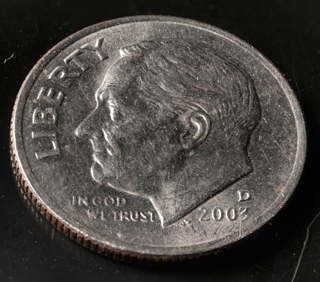
Non cropped (all of the
DX frame) Close Up of Dime, Nikon D300s, Lens Reverse
Adapter Ring 62mm, Nikon 35-70 Lens
A Dime is about 18mm in diameter
the DX chip is 23.6 mm wide
So the magnification is more than 1:1, maybe 2X.
|
|
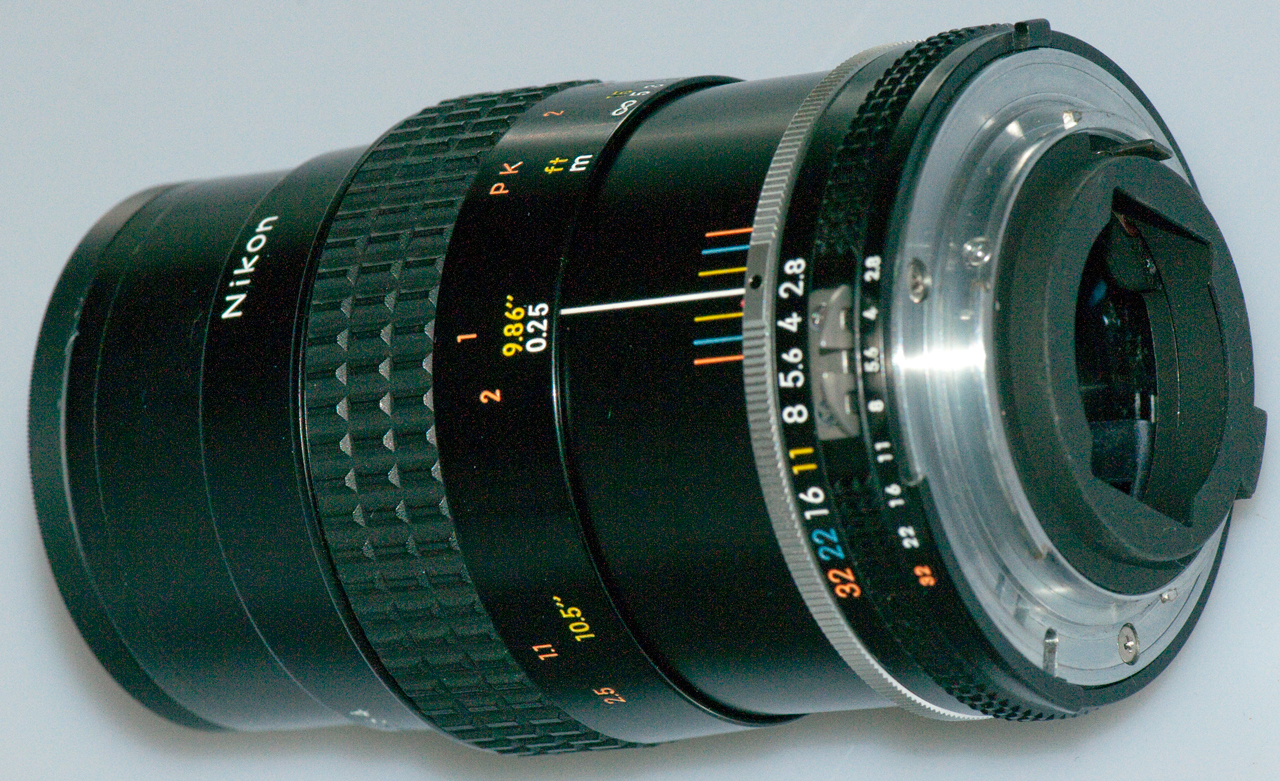
Nikon 55 mm f/2.8 AiS Marro Lens
Example
Note this lens has two
magnification scales one for the lens by itself and
one when the PK-13 is used.
Note the magnification is the same fro a full frame or
half frame camera.
It does matter when calculating the magnification
because you need to know the image size.
Note the focusing barrel on this lens moves the
complete lens assembly, that's to say it acts like
extension rings. So when the lens is reversed
there is no change when the focus ring is moved.
Except it acts like a variable length lens shade.
|
Nikon
55 mm AiS f/2.8 Macro Lens

|
Taken with Nikon 55 mm
AiS f/2.8 Macro Lens fully extended and mounted reversed
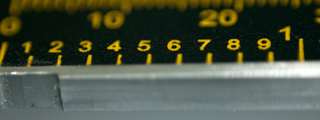
about 1.07" (21.18mm) showing on 23.6 mm chip or 1.1X
magnification
when lens used reversed. This is may just be the
extension
caused by the reverse adapter ring.
Notice front scale is in inches and rear scale is mm (1"
opposite 25.4mm)
|
55 mm with MC7 2X Teleconverter
|
Normal Lens Configuration

1" (25.4 mm) on scale or about 0.9X magnification
|
Reversed Lens
Configuration
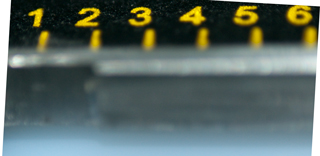
0.6" (15.24 mm) on scale or about 1.5X mag
Click on this photo and you can see 3D effects in the
yellow paint.
|
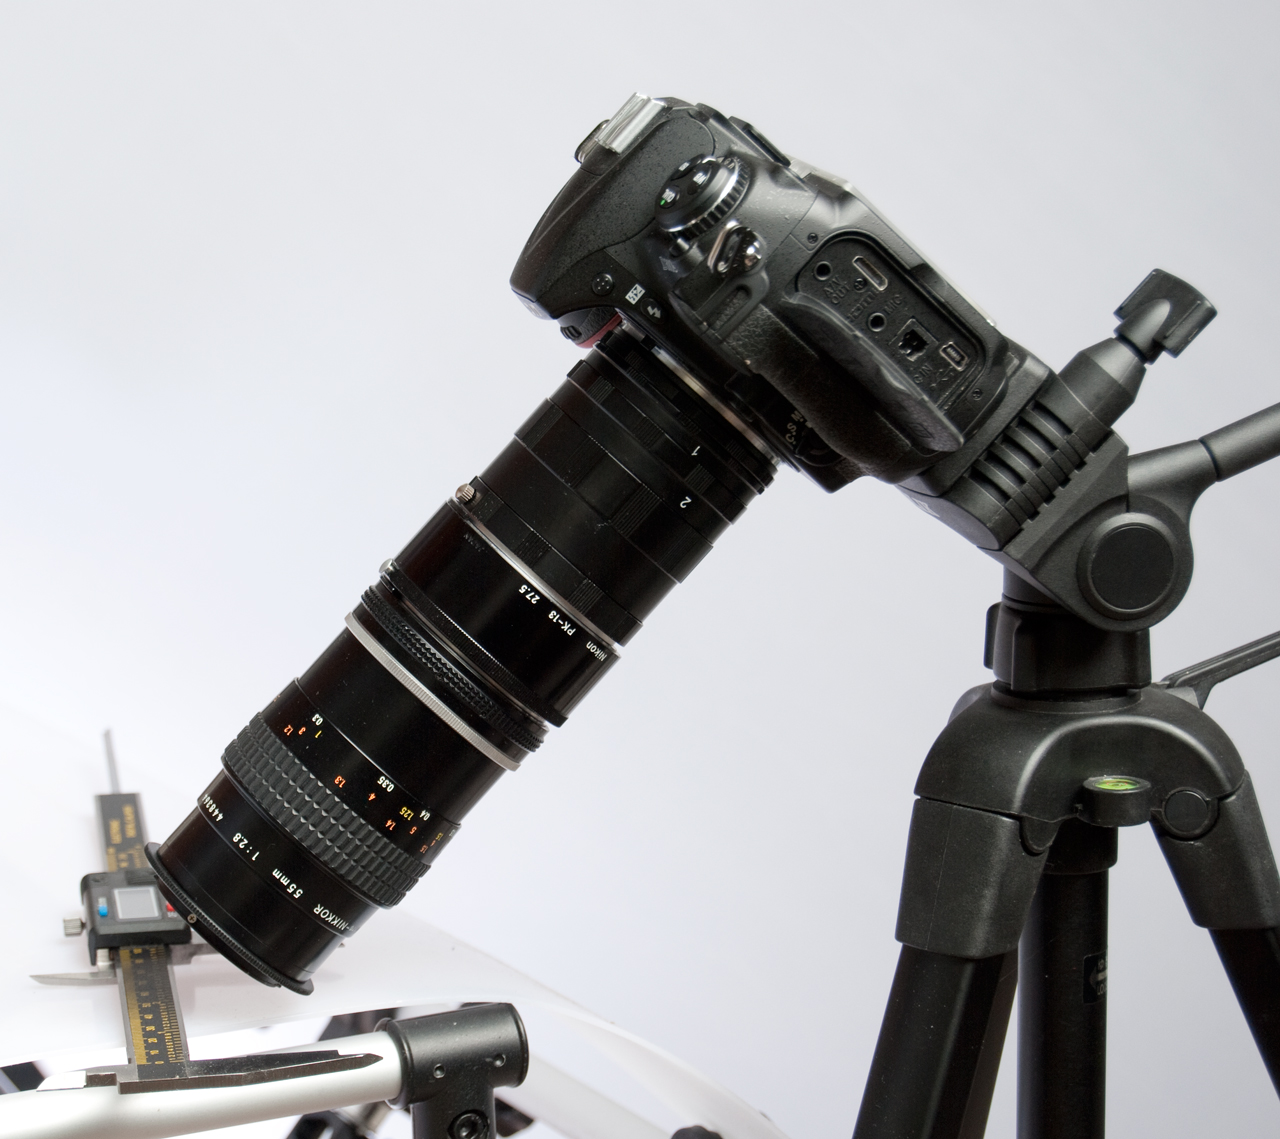
PK-13 27.5 mm Extension Ring for
the 55mm AiS Macro Lens
This only works when the
lens is used in the normal configuration.
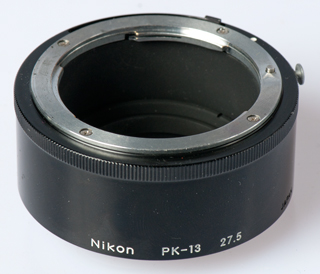
Threre is a coupling between the lens f/stop setting
and the camera body and so the camera knows the f/stop
setting. The settings on the lens and the camera
matches, I was expecting there to be an offset.
|
|

The image is 0.9" (22.86 mm) wide and the DX frame is
23.6 mm wide so 1X mag.
|
|
Nikon Extension Ring Set nominal
65 mm total length
This extension ring set (Made in China) has two defects.
1) the lens release does not work by pressing down, but
rather by pulling toward camera unlike all the other
Nikon equipment.
2) the female 56.77 mm O.D. threads are not cut far
enough along the centerline axis to allow the mating
parts to seat on the flanges, instead they are stopping
when the threads no longer fit so not ring 1 is jammed
into ring 2 and they will not come apart.
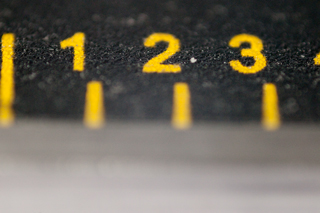
Rings
|
Length
|
none
|
15.92
|
1
|
|
1 + 2 (20.61)
|
37.76 (sb 36.53)
|
|
|
3 (28.13)
|
44.9 (sb 44.08)
|
|
|
|
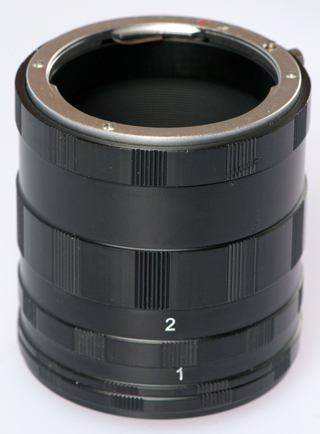
|
Nikon D3002 (FlexTT5
Wireless Strobe Trigger and E640 Flash
control removed and put on D60 to take this shot) +
PK-13 + all of Extension Ring Set Normal Lens Position.
84" Umb & White diffuser.

|
Same as at left except
Just the lens is reversed. The extension tubes
remain on the camera in the same position.

|
Taken with 55mm AiS Lens
Normal + PK13 + All of Extension Ring Set

About 0.45" (11.4mm) vs. 23.6 mm frame width so
2.0X mag.
|
Taken with 55mm AiS Lens
Reversed + PK13 + All of Extension Ring Set
About 0.39" (9.9mm) or 2.38X
|
For more about this lens
see StackShot below.
|
|
Digital Extension Ring Set
nominal max 86 mm

|
|
Bellows
A bellows allows for a continious range of extension
unlike the fixed steps when extension rings are used.
This was on eBay with the title:
Lens Macro Fold Bellow For Nikon
D70 D40 D700 D300 D200 by seller foto4easy.
The flange to flange distance when fully extended is
143 mm (5-5/8").
It can be used with the above extension tubes,
tele-extender and/or another extension tube.

You can NOT stack two of these bellows together to get
more extension. A poor design.
If you know of a Nikon-f type bellows that allows
stacking please let me know.
The setup above (full bellows extension, full 55mm lens
extension should result in 3.2X mag.
|
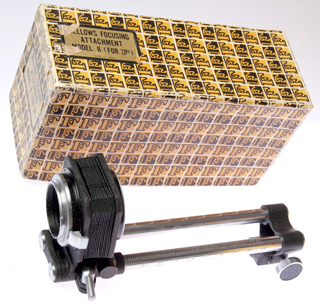
The Nikon Bellows
Focusing Attachment II (for F) does NOT fit the D300s
camera because of the right grip bump on the camer body.
|
Set of Adapters

|
|
Macro Lens
Most DSLR manufacturers offer some
lenses which have the ability to focus on close up
subjects. Typically all the way to 1:1. That's to
say the image of the subject on the imaging chip is the same as
the size of the subject. Although there are macro type
lenses with focal lengths near the normal focal length they are
not as popular as longer focal lengths. One of the main
reasons for this is that with the longer focal lengths the
subject ends up being maybe an inch or more in front to the lens
glass. But with the shorter focal macro lens the subject
may be a tiny fraction of an inch in front of the glass.
That's not good because the subject may scratch the glass and
because it's hard to get light on a subject without also getting
the light into the lens.
The
Nikon AF Micro-Nikkor 105mm
f/2.8G ED-IF AF-S VR is great for all around shooting and
especially for close up photography. But it's not good for
things like a fly or other small insect or spider.
Canon
MP E Macro lens - 65 mm - F/2.8
This is a reversed lens (
see above) that
has electrical contacts on the camera end to allow automatic
operation of f/stop and other things (maybe focus, maybe
magnification?). Nikon has no lens that competes with
it. Nov 2011 about $1,000. To use this lens requires
a cannon body.
Canon also makes DSLR cameras that do video recording
such as the T3, 60D, 7D and 5D MkII.
The EOS 7D is optimized for HD video.
All these cameras support either sRGB or AdobeRGB color space
Body
|
Res
|
Output
|
Video
|
$eBay
Nov 2011
|
| EOS
Rebel T3 |
APS-C
4272 x 2848 |
RAW
+ JPEG |
na
|
na
|
EOS
Rebel T3i
|
APS-C
5184 x 3456
|
RAW,
JPEG 14-bit
|
1080 |
335
- 600
|
| EOS
60D |
APS-C
5184 x 3456
|
RAW + JPEG |
|
|
EOS
7D
|
APS-C
5,184 x 3,456
|
JPEG,
RAW (14-bit, Canon original),
sRAW, mRAW, RAW+JPEG |
1080/24
1080/30
1080/25
|
675
- 1000
|
| EOS
5D MkII |
Full
Frame
5616 x 3744
|
JPEG,
RAW (14-bit, Canon original),
sRAW1, sRAW2, RAW+JPEG |
1080
|
1780
- 2560
|
Microscope Lens
There are a number of ways to use
a microscope lens.
Microscope
One way you can think of this a adding a camera to a
microscope. That can be accomplished a number of ways:
Camera Port
Some microscopes have
interchangeable eyepiece holders and one of those has a third
port where a camera can be mounted. The advantage is
that you look through the regular eyepieces to focus and frame
the image (including after changing the objective lens) then
take the photo with the camera using a separate light
path. Careful setup is required to make sure the camera
and eyepieces focus at the same place.
Prime Objective
Here the eyepiece is removed
from the microscope and the camera (without a lens) is
installed on the eyepiece tube. A SLR type camera would
allow focusing with enough light, but other types of camera
have specialized focusing needs.
Afocal (Wiki)
(Eyepiece projection)
The microscope eyepiece is in
place and the camera has it's normal lens in place. The
camera is focused at infinity. Although this is the most
straight forward method from an optical point of view, the
mechanical problems of mounting the camera exactly where it
needs to be and in such a way that it does not shake makes
this method a last resort rather than something you
should strive for. For example you can do this with a
cell phone camera in a pinch.
No Microscope
The microscope can be completely bypassed by mounting the
objective lens directly on the camera by means of
adapters. This saves the cost of the microscope.
You loose the substage positioning controls of a microscope,
although not all microscopes have them. Also the
mounting and focus distance problem now is part of the
camera's job.
Using something like the
StackShot
- a motorized rail camera mount that moves the camera and
trigers an exposure over and over again
C/CS Mount TV Lens
This is very similar to using a
series of adapters to mount a TV (16 mm movie) lens on a digital
camera either in a normal configuraion or with the lens
reversed. It turns out that as the image sensor area gets
smaller the size (and cost) of a lens to cover that area is also
smaller. So excellent lenses for 16 mm film (TV cameras)
cost less than 35 mm film lenses and they cost less than 120
roll film lenses like used on Hasselbald cameras and these cost
less than the lenses used on 4x5 and 8x10 view cameras.
Cone of Light
A thought about the relative
merits of using a microscope lens, TV lens, 35mm size camera
lens, or larger lens is which would be better. The best in
terms of resolution would be the fastest (lowest numerical
f/number) diffraction limited lens (few are).
Note: microscope lenses use
Numerical Aperture
(Wiki: NA)
instead of f/number.
(f/number)working = 1/(2 * N.A.) *[ m /
(m-1)]
where:
N.A. is the Numerical Aperture
m is the magnification
for a 4X objective the common N.A. values range between 0.1 and
0.17 or the f/number (ignoring magnification) is f/5 to
f/2.9. My guess is that many of them are diffraction
limited.
But, they are designed to be used in a microscope tube that's
160mm long and 23.2 mm I.D. so there will be some vignetting.
When a camera lens is used in the reversed position the filter
thread to lens mount adapter may have a smaller hole than the
lens diameter thus raising the numerical f/number and degrading
the resolution. This could be avoided by using an adapter
from lens filter thread to a larger diameter tube, then closer
to the camera body stepping down so that the cone of light was
not effected.
Optical Theory
Depth of Field Calculator
Julian Loke's
Depth of Focus Calculator
- Not sure how to specify a lens, like the Nikon 55mm f/2.8 AiS
macro that has more extension than a normal lens, or how to
combine that with external extension.
Choosing f/Stop
See
Digital Photography
101: Basics Resolution for a general discussion of
resolution.
See
Digital Photography
101: Basics Depth of Field - Fepth of Focus for a
general discussion.
Single Exposure
When taking a single exposure it's
common to stop the lens down to the smallest aperture.
Typically macro lenses have a smaller f/stop than a conventional
lens, like F32 or smaller. This allows getting a greater
depth of focus (
Wiki)
but there are some disadvantages to doing this. First it
takes a lot more light. If incadencent lamps are used
there is enough heat associated with the light to cook the
subject and it's difficult to physically get the lights where
they need to be because the subject in very close to the front
of the lens. Second the resolution of the lens is degraded
a lot since resolution is directly related the the effective
objective diameter, smaller f/stop = poorer resolution.
Focus Stacking - Multiple Exposures
Getting the maximum depth of focus
in each image is no longer the prime consideration since it's
accomplished by stacking images. Now there's a trade off
between the number of images needed in the stack vs. the
resolution of each image. For the highest resolution the
lens should be set wide open (if the lens is of very high
optical quality) or at the "sweet spot f/stop".
Focal Length
See
Digital Photography
101: Basics Focal Length for a general discussion.
To get increased magnification requires using some method of
extending the lens to camera distance. This needs to be done
is a way that is very stable. Note the longer the extension the
higher the magnification so it's even more important for longer
extensions. If there's any movement or misalignment caused
by the extension then the image may be degraded. The longer
the focal length of the lens the longer the extension needs to be,
so using a lens with a shorter focal length has an advantage.
The distance between the lens and subject for a given
magnification will be greater for longer focal length
lenses. This has implications in terms of having enough room
to light the subject, so longer focal length lenses have an
advantage in that respect.
The Canon MP-E macro lens is 65 mm. The two Nikon macro
lenses I have (see above
55 mm,
105 mm) are 55 mm and 105 mm.
Magnification
Magnification (
Wiki) is
the ratio of the image height on the imaging chip in the camera to
the subject height. This would be the final magnification if
you were using a film camera and made a contact print. But
if the print is an enlargement then the final magnification is
themagnification times the enlargement radio. For example if
the taking magnification is 1:1 (a common limit for a macro lens)
taken on a half frame digital camera (like the Nikon D300s or D60)
which has a chip size of 18x12 mm and the print size is 8" x 12"
(203mm x 305mm) then the final magnification is about 17 X.
M = hi/ho = di/do = FL/(do - FL) = (di - FL)/FL
M: Magnification
hi: Height of Image
ho: Height of Object (subject)
di: Lens to Image distance
do: Lens to Object distance
FL: Focal Length of Lens
Lens Distances
Wiki (
Optical
Lens - Imaging Properties)
1/FL = 1/do + 1/di
A key point that bears repeating is that when the distance between
the lens and the imaging chip is the focal length objects located
at infinity will be in focus.
If do is infinity then 1/do is zero so di must = FL.
For example a magnifying glass focusing the Sun into a small spot.
When the lens is twice the focal length in front of the imaging
chip subjects that are two focal lengths in front of the lens will
be in focus and the magnification will be 1:1.
If do = di then 1/FL = 1/do + 1/d0 = 2/do or do = 2 * FL
As the lens is moved further and further away from the imaging
chip the magnification will increase until the lens is one focal
length away from the subject at which point the magnification will
be infinite.
If do = FL then di is infinity and mag is infinity.
For example a condenser lens in a slide projector is focused on
the lamp filament and projects a beam of collimated light
Flange Focal Distance (Wiki)
This Wiki page has a table of the distance between the
camera flange and the front surface of the image sensor chip for
many cameras.
For the Nikon-F lens mount this distance is 46.5mm.
This number is needed when doing lens related computations.dig
This distance puts a bound on what focal lengths can be
used.
Extension Calculations
Using the 55mm AiS lens.
When focused all the way toward infinity the length of the lens
from camera flange to front (without any filter or adapter ring) =
62.17mm.
When fully extended the flange to front distance is 95.35mm or an
extension of 33.18 mm
The Nikon Flange Focal Distance is 46.5mm.
The Nikon DX chip is 23.6 mm wide (not half a 35mm film frame that
I wrongfully thought).
FL = 55mm - 46.5 mm = 8.5mm distance from flange to focal point of
lens.
62.17 Lens length - 8.5mm = 53.67 mm distance from front of lens
to optical center.=
Case 1 Fully Extended Normal Lens (0.5X nominal)
The "2" on the reproduction scale means 1:2 film:sulject or half
size image).
When fully extended di = 55mm + 33.18 mm = 88.18mm
Mag =
(di - FL)/FL = (88.18 - 55) / 55 = 0.6X close to the
0.66 measured and near the 0.5X in the specs.
Case 2 Fully Extended Normal Lens + PK -13 (1X nominal)
Now di increases by the PK-13: 88.18 + 27.5 = 115.68mm
Mag = (115.68 -55) / 55 = 1.1X close to the spec of 1X.
Case 3 Fully Extended Normal Lens + PK-13 + 65MM Extension
Ring Set (2X nominal)
di = 88.18 + 27.5 + 65 = 180.68
Mag = (180.68 - 55) / 55 = 2.29X Actual is more like 2X
Case 4 Fully Extended Lens (33.18mm) + Fully extended Bellows
(143mm)
di = 55 + 33.18 + 143 = 231.18
Mag = (231.18 - 55) / 55 = 3.2
Hardware
This is what holds everything where
it belongs. I've found that as things get smaller the
hardware needs to be stiffer (stronger heavier). So expect
that as the magnification goes up it becomes more and more
important that the possible relative movement in the system be
minimized during the exposure time. (10/16/2011 Adobe
announced that they have a
Image
Debluring application for Photoshop in development, but it's
been my experience that it's still best to go to some lengths to
minimize motion while the shutter is open because there's a limit
to what can be done.
The Nikon D300s is a relativity heavy camera when compared to a TV
camera and so mounting it to a microscope may not be a good
idea. It seems like a better idea to add whatever optics are
going to be used directly to the D300s and then mount the D300s to
something that can hold it. That might be a tripod, like the
Tiltall that can be used with
the center column inverted and optionally with the
StackShot
automated motion stage to allow focus stacking.
Another option may be to build a bench top setup for the
StackShot
that would include a stage for the subject and provision for
strobe lighting.
StackShot
As receivd photo of stack
shot, IR remote, Nikon Cable release cord.

|
Nikon D300s in Mirror Up
mode,
StackShot Configuration 2 shots/slide stop

|

|
Dime 12
shots 750um spacing, Photoshop CS4 stack, D300s, 55mm
f/2.8 AiS Rev, StackShot
On my monitor (1280x960) the photo at left is 3-3/4" dia
(5.4X)
When I click on it the new image is 9-3/4" dia (14X) and
the cursor is a (+) s0,
clicking again makes it 14-3/4" diameter (21X)
Light from Einstien E640
|
Einstien E640 + 22" Spun
Aluminum Parabolic Relfector (Retro Laser) light
modifier. This single light was used for the photo
of the Dime.
|
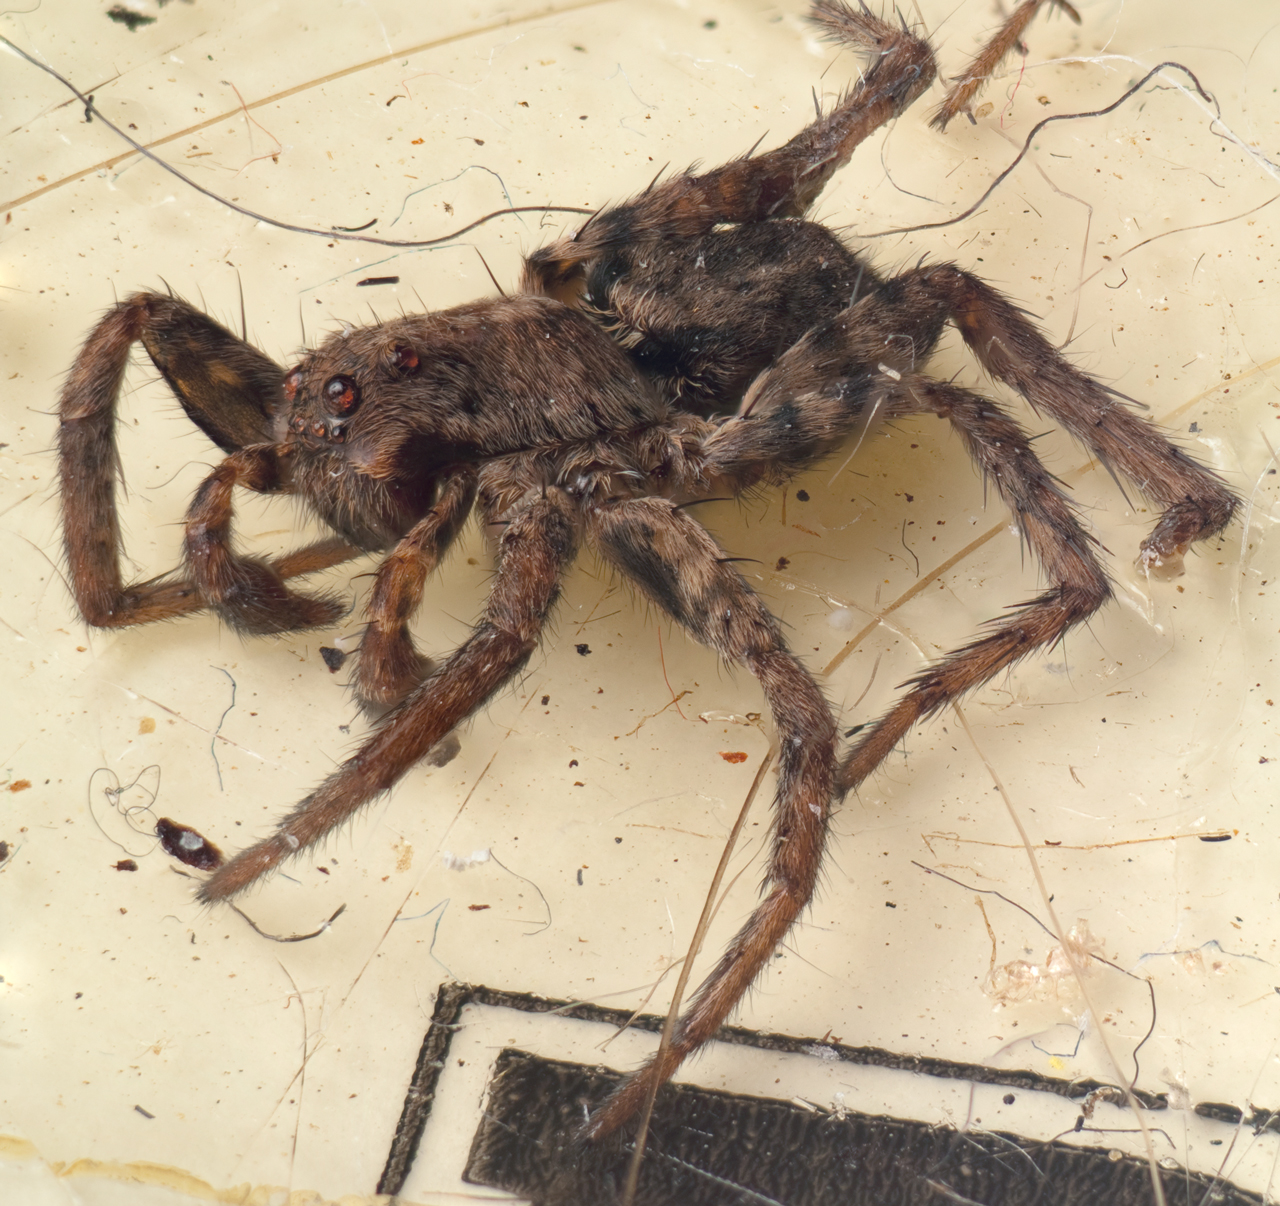
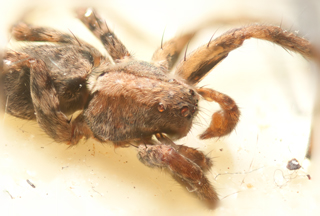
Spider - 22 images stacked
MC7 + PK13 Reversed 55mm AiS
|
|
|
Same spider as above, but
from other side
Wolf spider (Wiki)
8 eyes

|
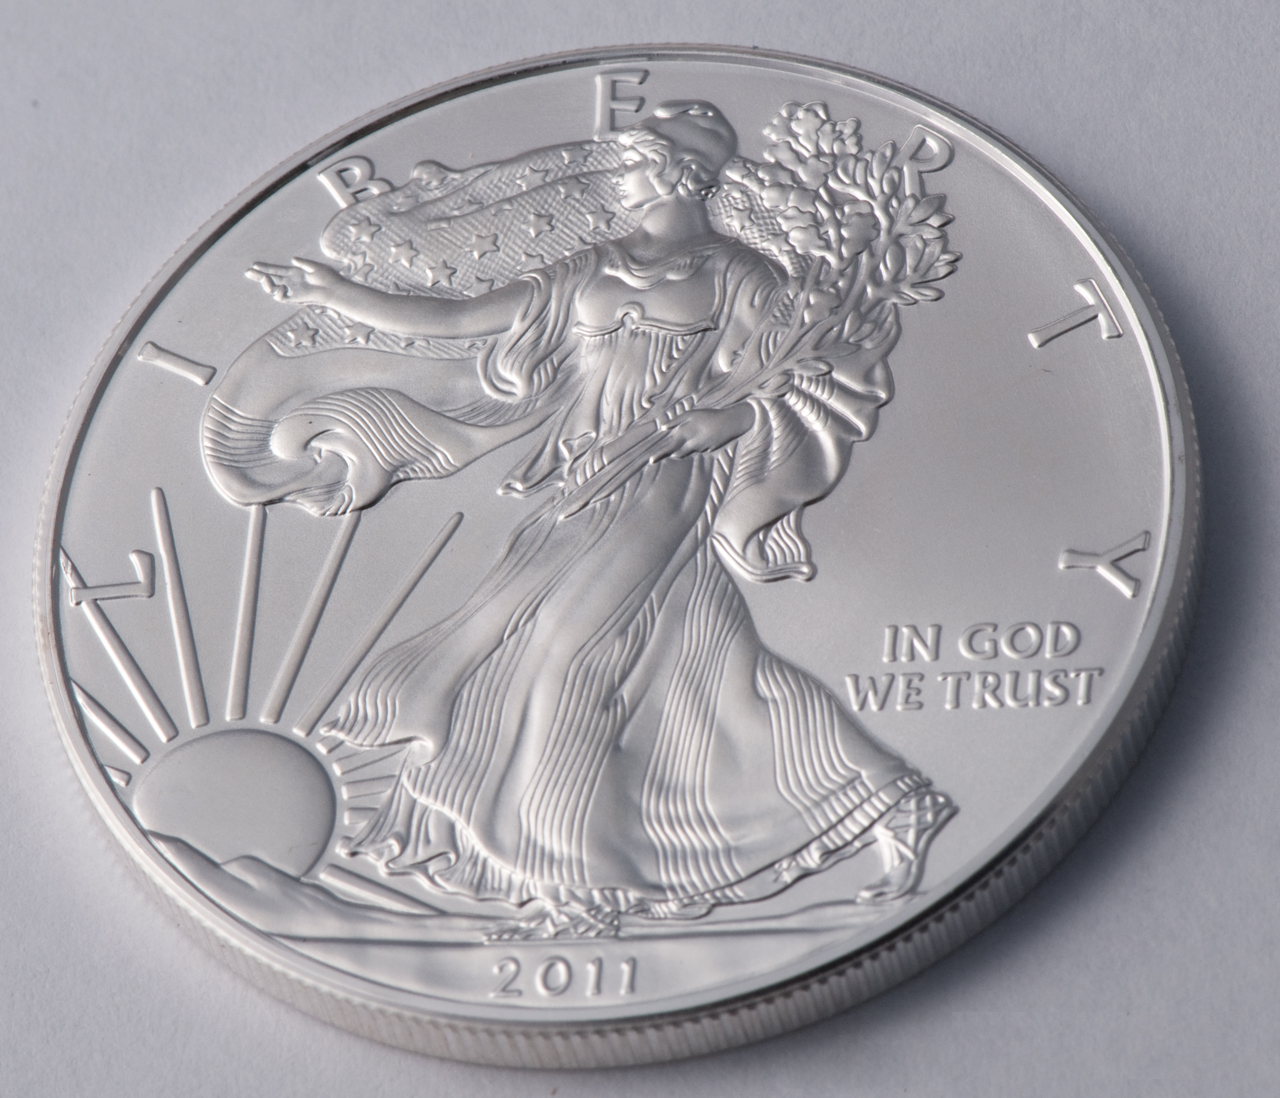
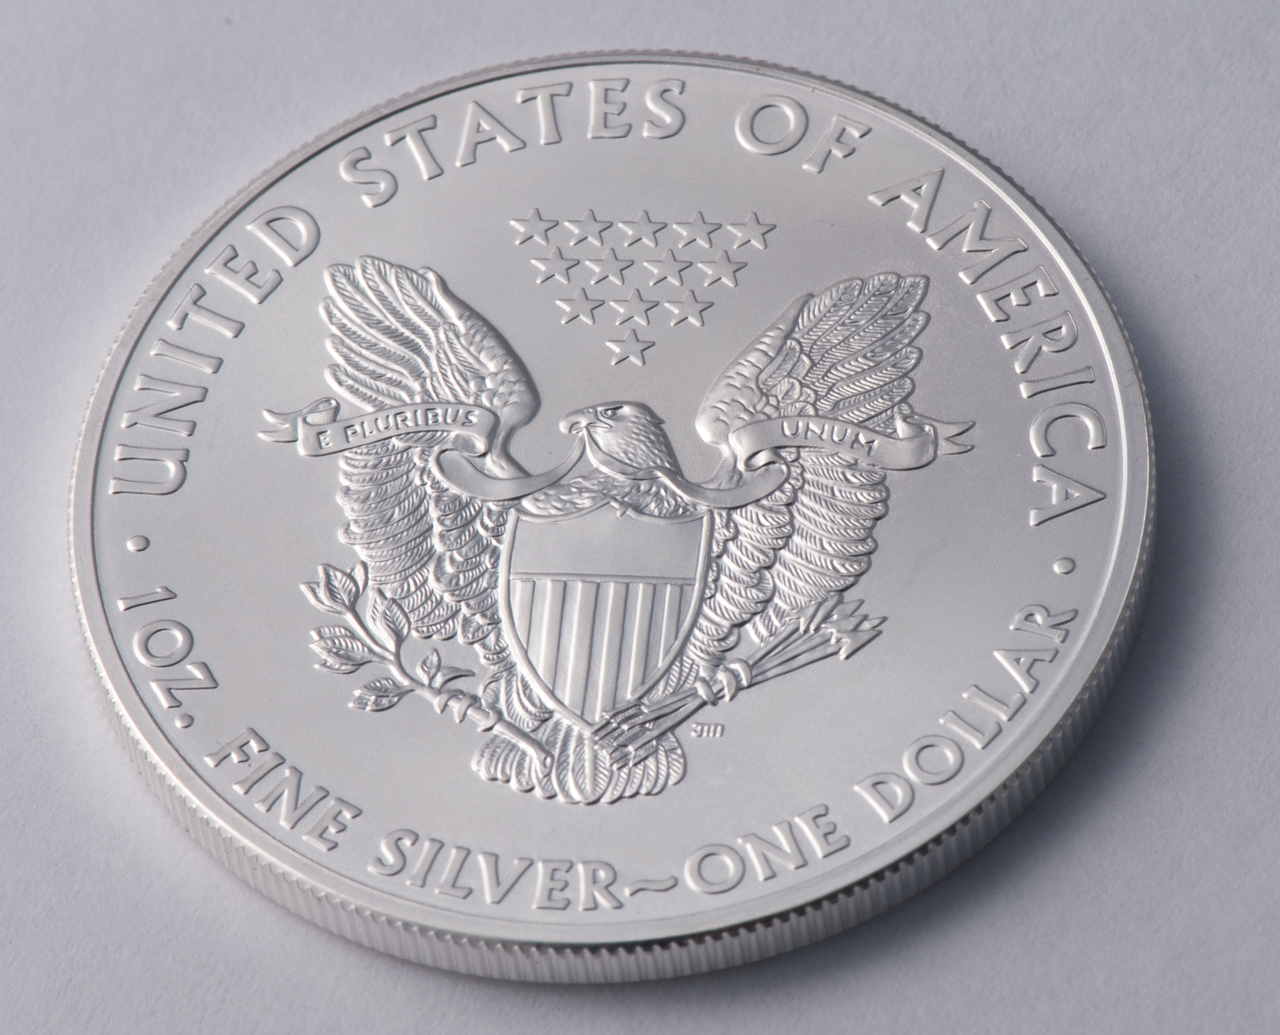
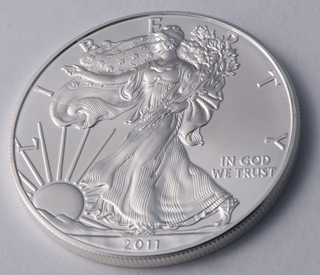
Real
2011 U.S. Silver Dollar
I was going to use the StackShot to take photos of some
coins, but this shot was all in focus because the coin is
big enough the high magnification is not needed to see all
of it.
But taking a close up of some feature might require focus
stacking.
|

|
|
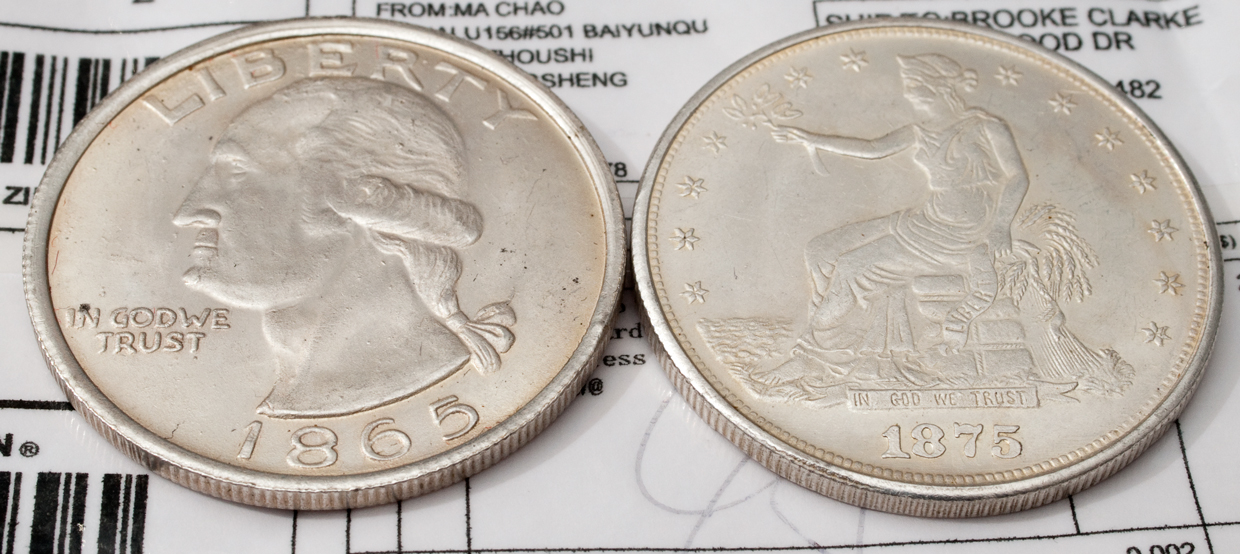
Fake1865
& 1875 US Silver Dollars Front
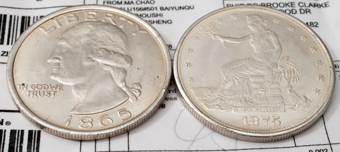
|
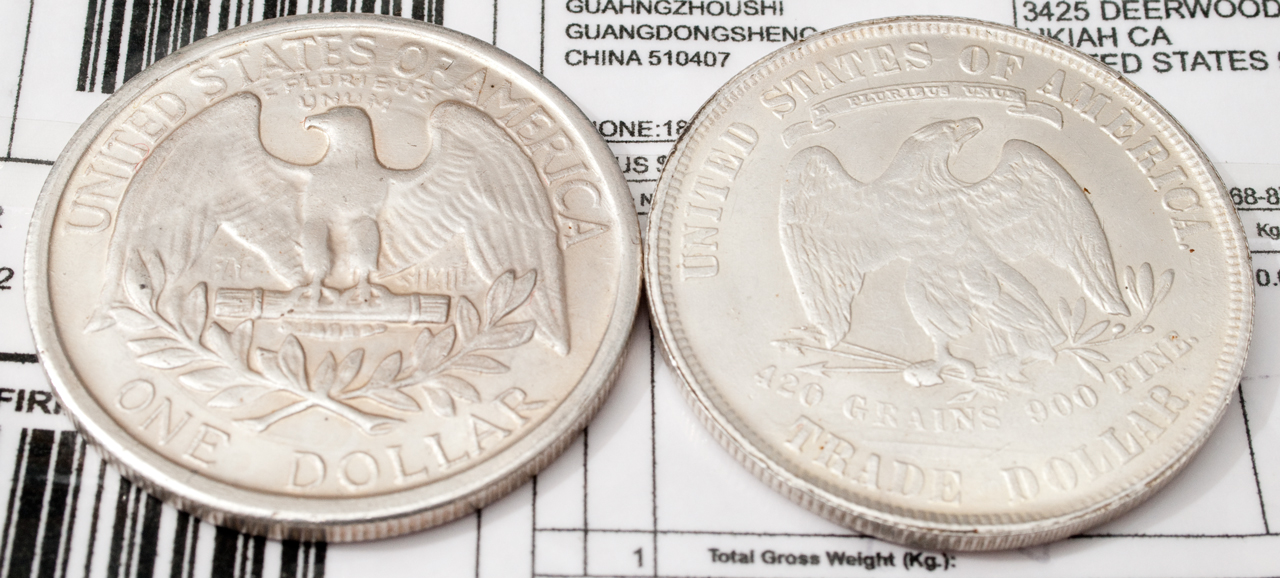
1865 & 1875 US Silver
Dollars Back

|
<- taken hand held with
35-70mm lens &
off camera SB-900 storbe using Pocket Wizards.
It turns out these are fakes.
1) a magnet will pick them up.
2) they weigh 17 g not 27g
|
|
|
|
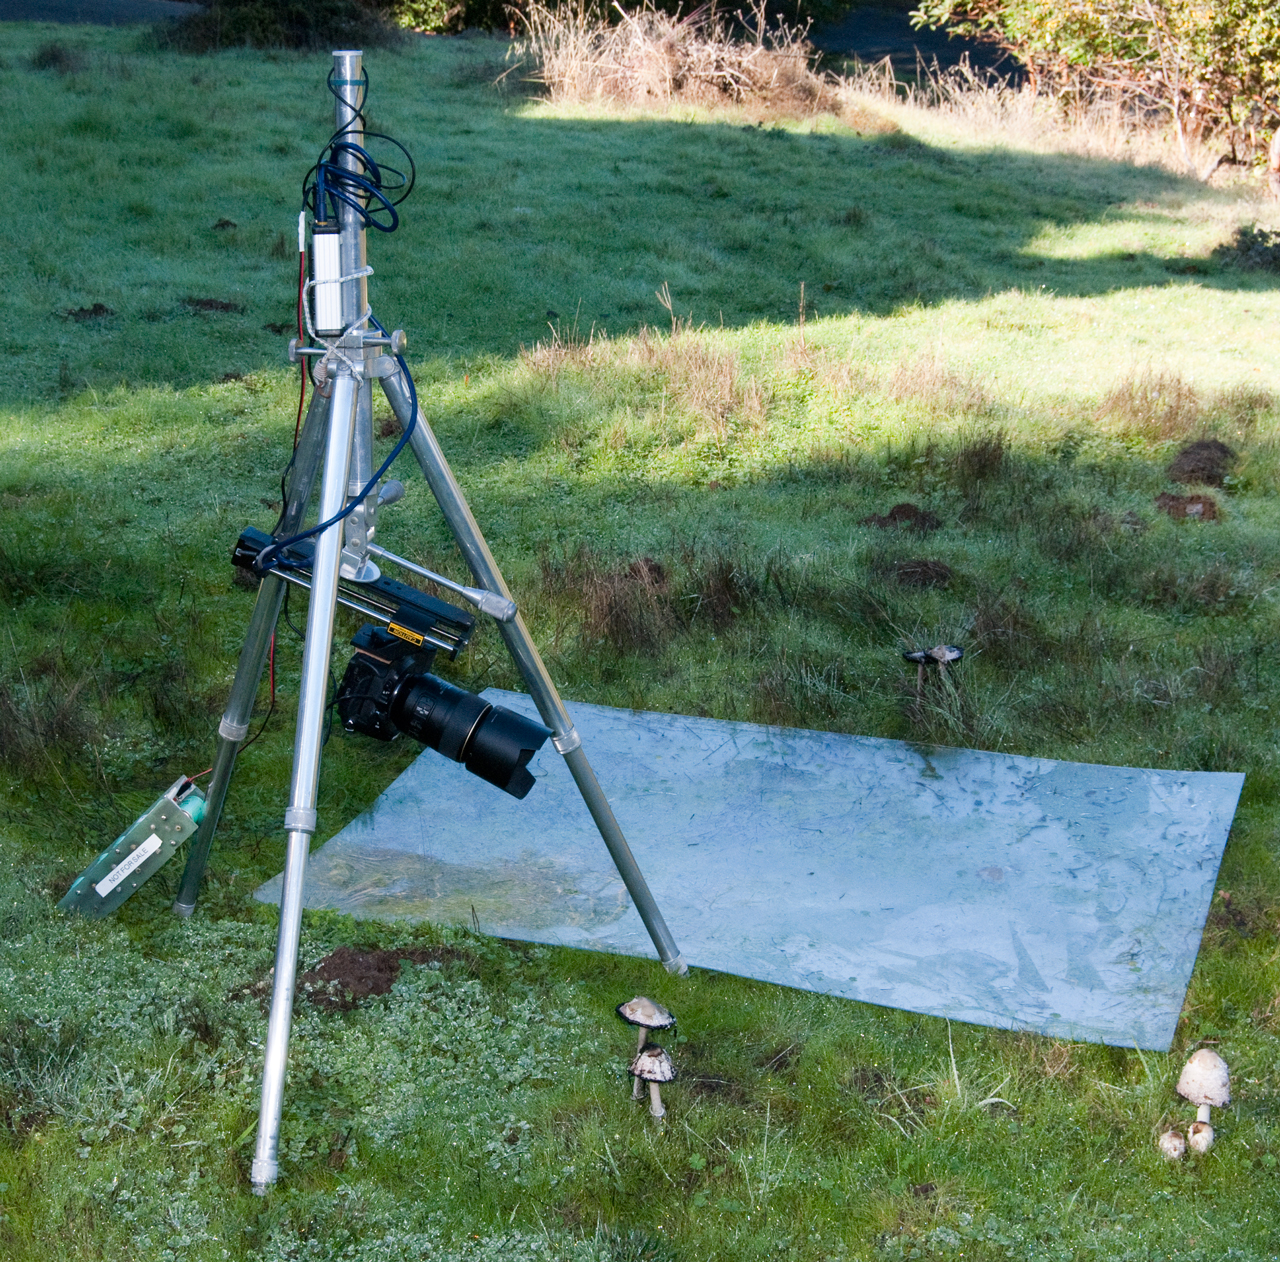
Battery Power
The plastic sheet is to
keep out of the dew.
The cable from the 257477BA battery adapter would be
better if 8 feet long.
Bunge cord holding SnapShop Computer to tripod.
Need to really know Depth Of Focus, other wise you take
way more shots than needed.
Should check to be sure camera has fresh battery before
starting.
Major Problem is no way to switch to portrait
mode. Maybe an angle bracket?
|
|
 |
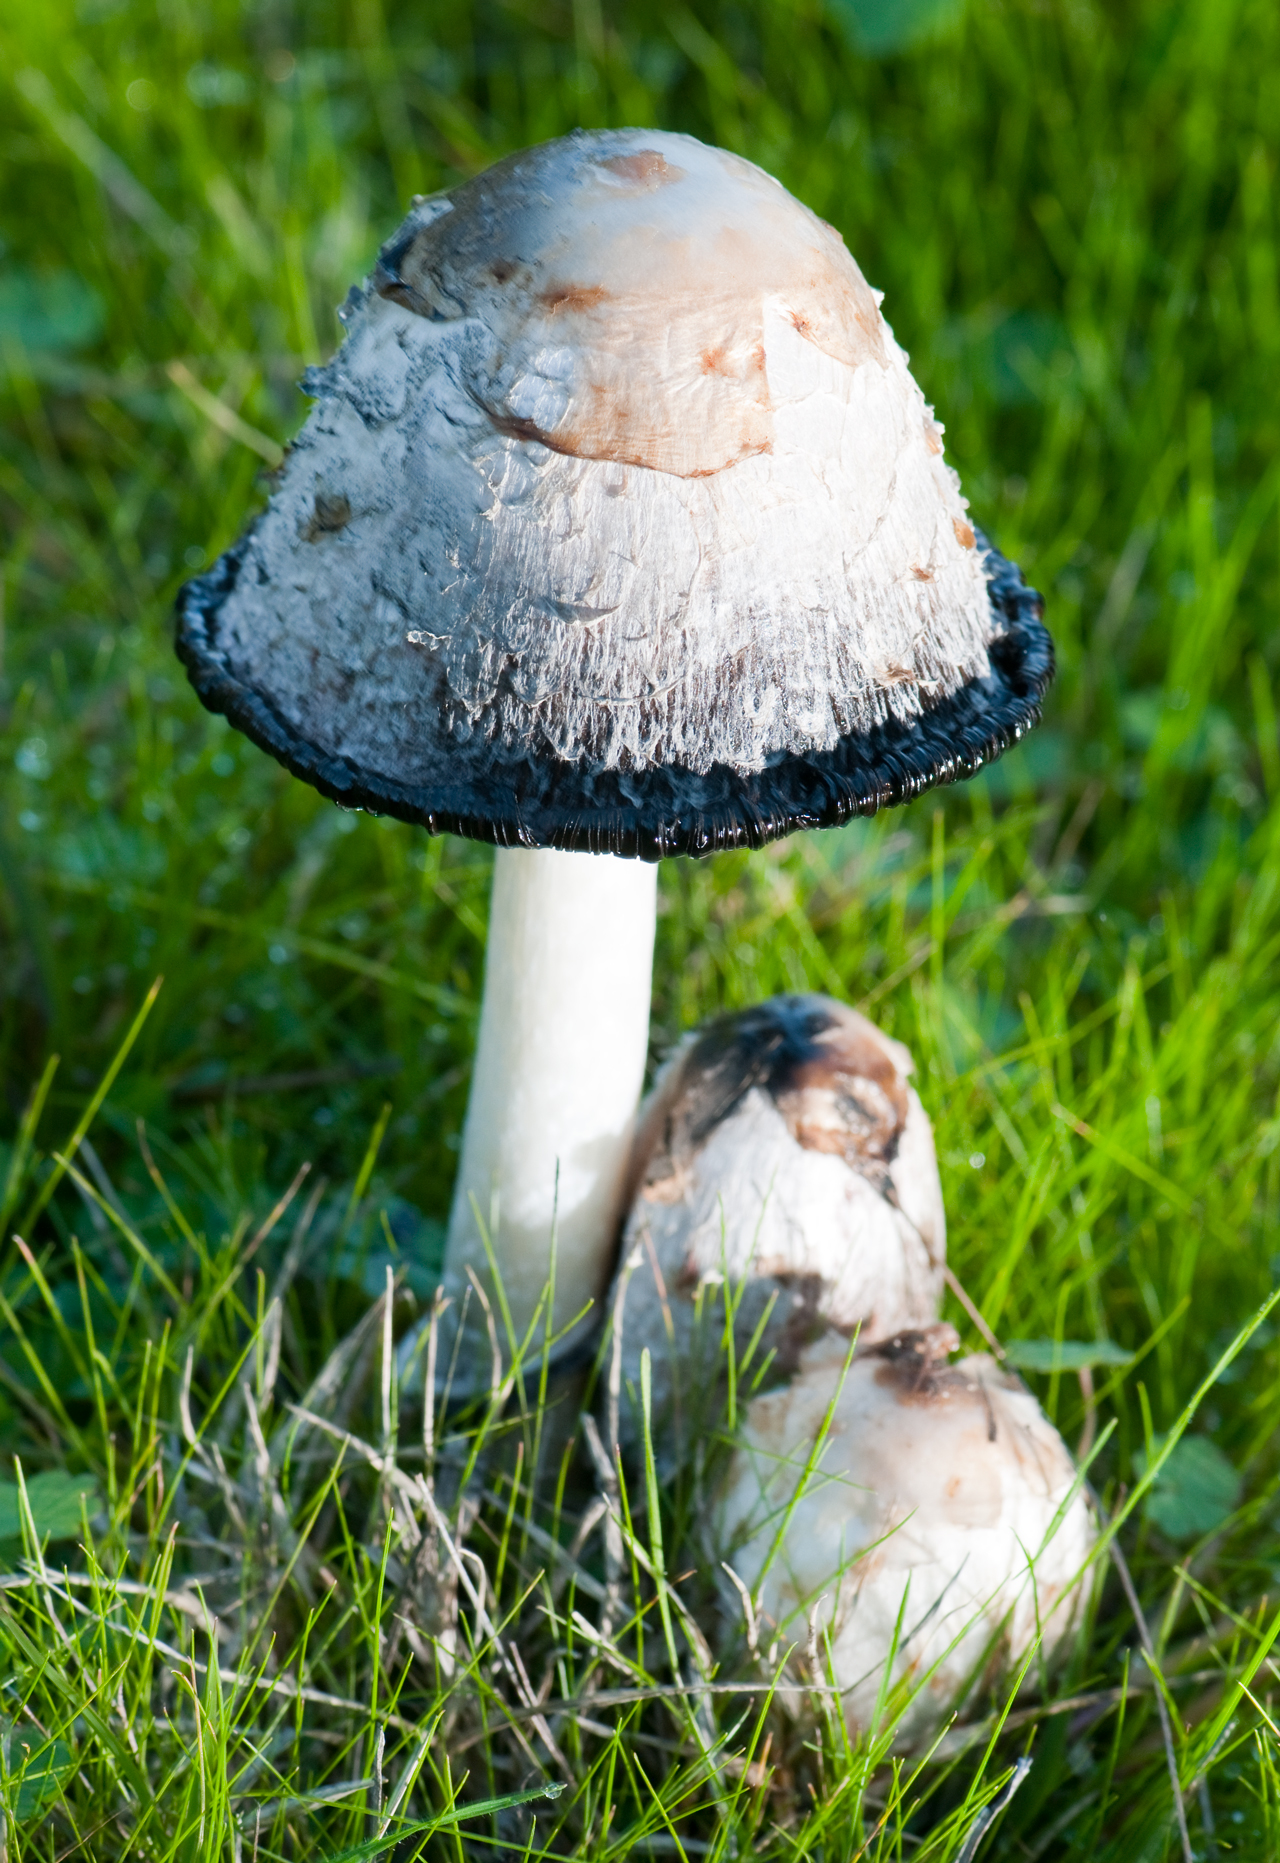
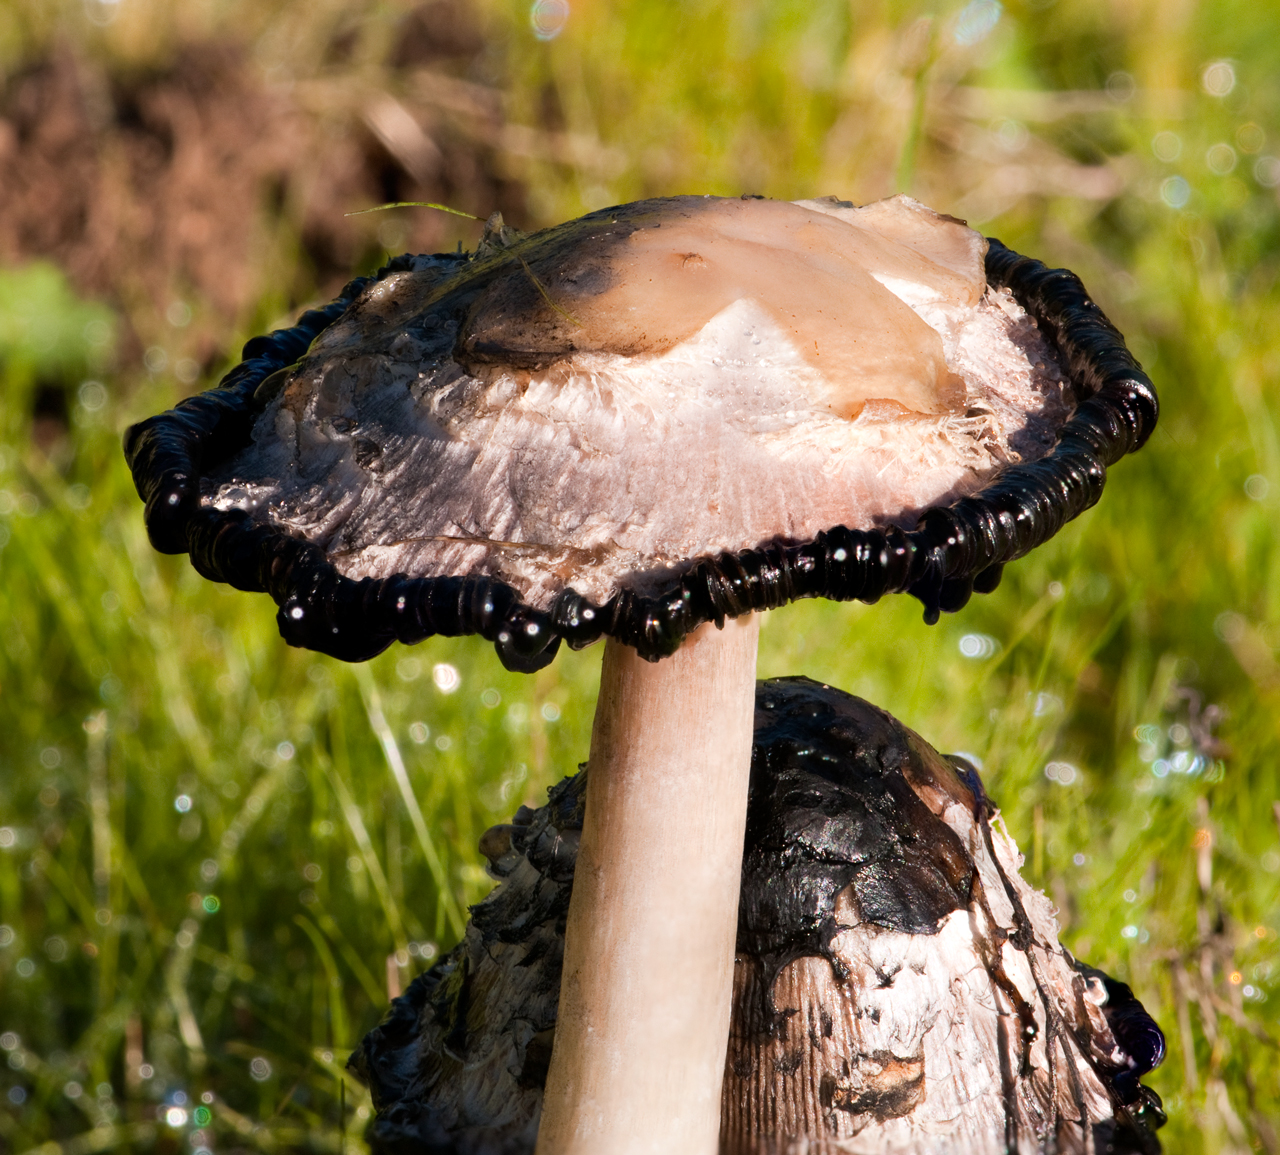
Not Stacked Mushroom
taken 9:15 am

|
Not Stacked Mushroom at
left taken 10:00 am
Notice black area eating up dome.

|
Different Mushroom after
another day or more.
Stack

|
The Stack Shot wall wart power supply is rated 12V <= 2
amps. Positive center contact.
The DC power plug appears to be a common 5.5 x 2.1mm type.
The
10 "D" cell battery
adapter with the Power Pole option will power the
StackShot or a Cigarette Lighter Plug cable with the correct DC
power plug.
The battery from the
Vagabond AC
Inverter that goes with the E 640 studio strobe will also
work as a power source.
-
StackShot
- moves camera, triggers shutter, keeps doing it. Shutter
release cables for common cameras. 200mm extended slide.
Computer connection with USB.
Pat
App 12/927,166 Motor controlled macro rail for close-up
focus-stacking photography
Trinamic
PANdrive PD-110-42 available from
Semiconductor
Store (California) a stepper motor combined with a RS-232
interface and some smarts.
Open-source Photographic Motion
Control technology.
Software
Because depth of focus is very
shallow when working with very small subjects, focus stacking is
a very important process.
Helicon
Focus stacking software works with some automated motion
control hardware
An
Introduction to Focus Stacking — Extended Depth of Field
Digital Photography by Rik Littlefield
Wiki
Focus Stacking
An
Introduction to Focus Stacking - changing the lens focus
not as good as moving camera
There are third party programs for focus stacking. A
free program is CombineZ() As of 12 Oct 2011 it's
CombineZP
by Alan Hadley, prior versions were CombineZ5 and Combine
ZM. The name is derived from Combining images that are
stacked in the Z plane, i.e. X & Y are the left right
planes and Z is the up and down plane. The author of the
program uses it for taking photos of things like insects using
a microscope.
Prices range from $40 to $290.
Price range $30 to $350.
Supports
Trinamic
PANdrive PD-110-42 & StackShot