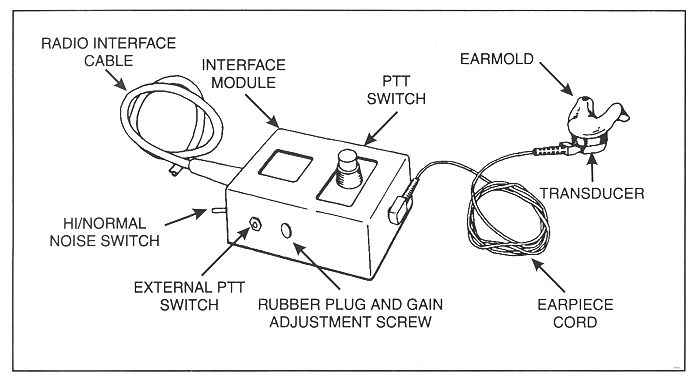
The Ear-Mike Transducer System consists of the transducer, an earpiece cord, an earmold, and an interface module (see illustration). A separate radio interface cable connects the Ear-Mike Transducer System to the radio. (Cables are available to interface the Ear-Mike Transducer System to a wide variety of radios.) The transducer snaps onto the earmold which is then inserted into the ear. The earpiece cord plugs into the transducer and the side of the interface module.
The interface module contains a microphone amplifier. Operating power
for the amplifier is supplied by a single, AA-size battery (already installed).
The Push-To-Talk (PTT) switch activates the amplifier for speech output
to the radio and also keys the radio for transmission. An external PTT
switch jack is also provided for use with an optional remote PTT switch.
The HI/NORMAL noise switch, located on the end of the module, sets the
microphone gain for best performance in either normal-noise or high-noise
environments. Additionally, a gain control is provided to adjust the output
level for use with various radios. This control is accessible by removing
the rubber plug from the side of the interface module.
1. Assemble the components as shown in the illustration below, and plug the radio interface cable (ordered separately) into the radio.

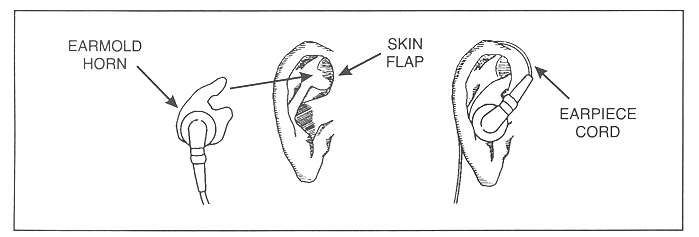
2. Insert the earmold into the ear using a gentle twisting motion. Make sure that the horn (pointed part) of the earmold is behind the skin flap at the front of the ear. Run the earpiece cord up over the ear and down behind. The ear now becomes your cord restraint.
3. Attach the interface module to a convenient place on your body.
4. Turn on the radio, and adjust radio volume and squelch as desired. The Ear-Mike Transducer System is now ready for use.
5. To transmit, press and hold the PTT switch and begin talking.
6. To receive, release the PTT switch.
7. Set the HI/NORMAL noise switch to NORMAL if background noise is not excessive. If background noise is a problem during transmission, set the switch to the HI position. Use hearing protectors in high-noise environments.
1 . Prepare the Ear-Mike Transducer System for use as described in Operation. (The radio you connect the Ear-Mike Transducer System to will function as the transmitter.) Set the HI/NORMAL gain switch to NORMAL.
2. Position a second radio (to be used as a receiver) approximately 6 feet (1.8 m) from the first radio, and face it away from you. Set the second radio to half volume.

3. Remove the rubber plug from the gain adjustment hole on the interface module.
4. Press-and-hold the PTTswitch, and note the output from the receiver:
a. If feedback squeal is noted, insert the small, flat-blade screwdriver through the gain adjustment hole, and slowly rotate the gain adjustment control counterclockwise until the feedback squeal just stops.b. If no feedback squeal is noted, insert the screwdriver through the gain adjustment hole, and rotate the gain adjustment control clockwise until squealing just starts; then rotate the control counterclockwise just far enough to stop the squealing.
5. After adjusting the gain, check operation by talking in a normal voice and noting the output from the receiver. Then whisper and note the output. In both cases, the output should be clear and crisp. If not, repeat step 4.
6. Replace the rubber plug. The Ear-Mike Transducer System is now ready for use.
HI/NORMAL Switch 12 dB
level change
Battery
1.5-volt, AA-size
Battery Current
Less than 2.5 mA with PTT switch pressed; otherwise zero
Dimensions
3.1 x 2.2 x 1.0 inches (79 x 56 x 25 mm)
Weight
5.5 oz (156 grams)
TELEX
TELEX COMMUNICATIONS, INC. 9 12000 Portland Ave. S., Burnsville, MN
55337 U.S.A.
38109-270 Rev G March 2001