Digital Photography 201: Stacking Images
© Brooke Clarke 2011Focus Stacking 1 - Adobe Stack
Focus Stacking 2a - Adobe Stack & Stitch
Focus Stacking 2b - Adobe Stack
Focus Stacking 3 - Non Adobe
High Dynamic Range Stacking
Adobe online CS4 Tutorial on HDR
Example
Nikon Active-D Lighting
Panorama, Stitching, Cylindrical & Spherical Image Stacking
Object Removal Stacking
Higher Resolution Stacking
Blur Removal
Books & DVDs
Related
Links
Background
For learning about Adobe products there are video tutorials at: http://tv.adobe.com/
Focus Stacking (Wiki)
The book Digital Macro Photography (2006) has no mention of focus stacking, but does cover other aspects of Photoshop.
In Photoshop CS4 (starting with no images loaded):
File \ Scripts \ Load Images Into Stack (do not use: File \ Automate \ Photomerge)
Click on Browse and select the files to stack (holding CTRL and using the mouse allows selecting non adjacent files)
Leave both of these unchecked: Attempt to Automatically Align Source Images & Create Smart Object After Loading Layers
Click OK
In Layers, select all or in the top menu Select choose Select All Layers
Edit \ Autoblend Layers Check Stack Images and optionally select Seamless Tones and Colors
 |
 |
Seamless Tones and
Colors Not Selected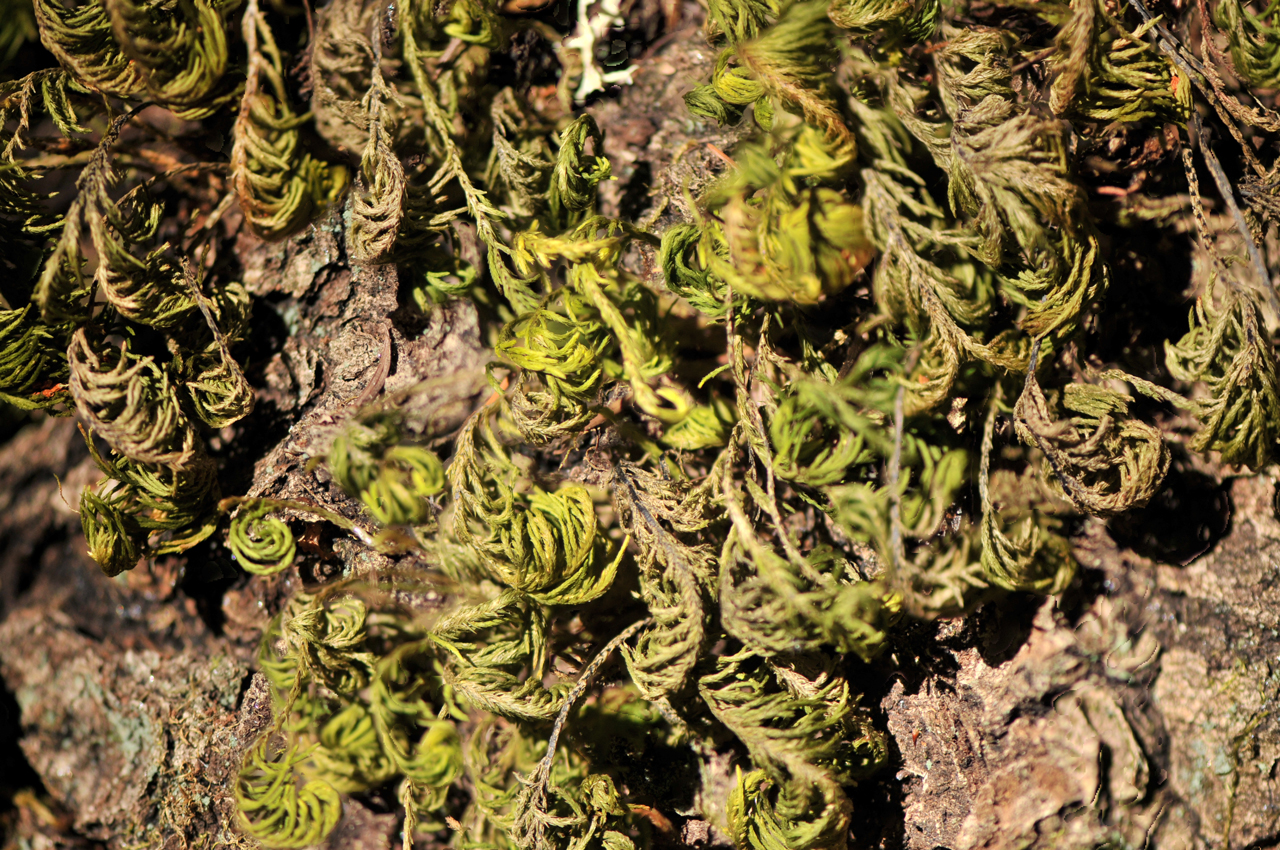 |
Seamless Tones and
Colors Selected |
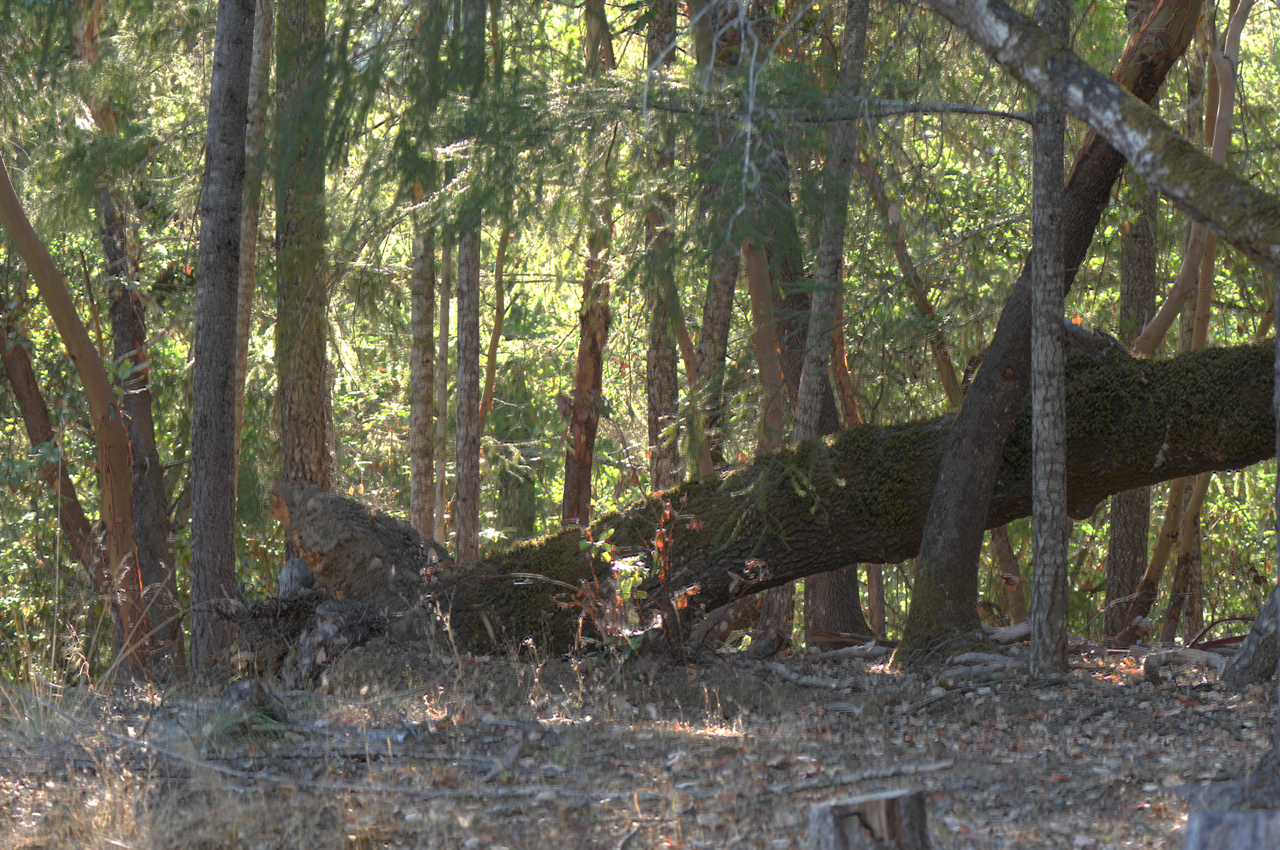
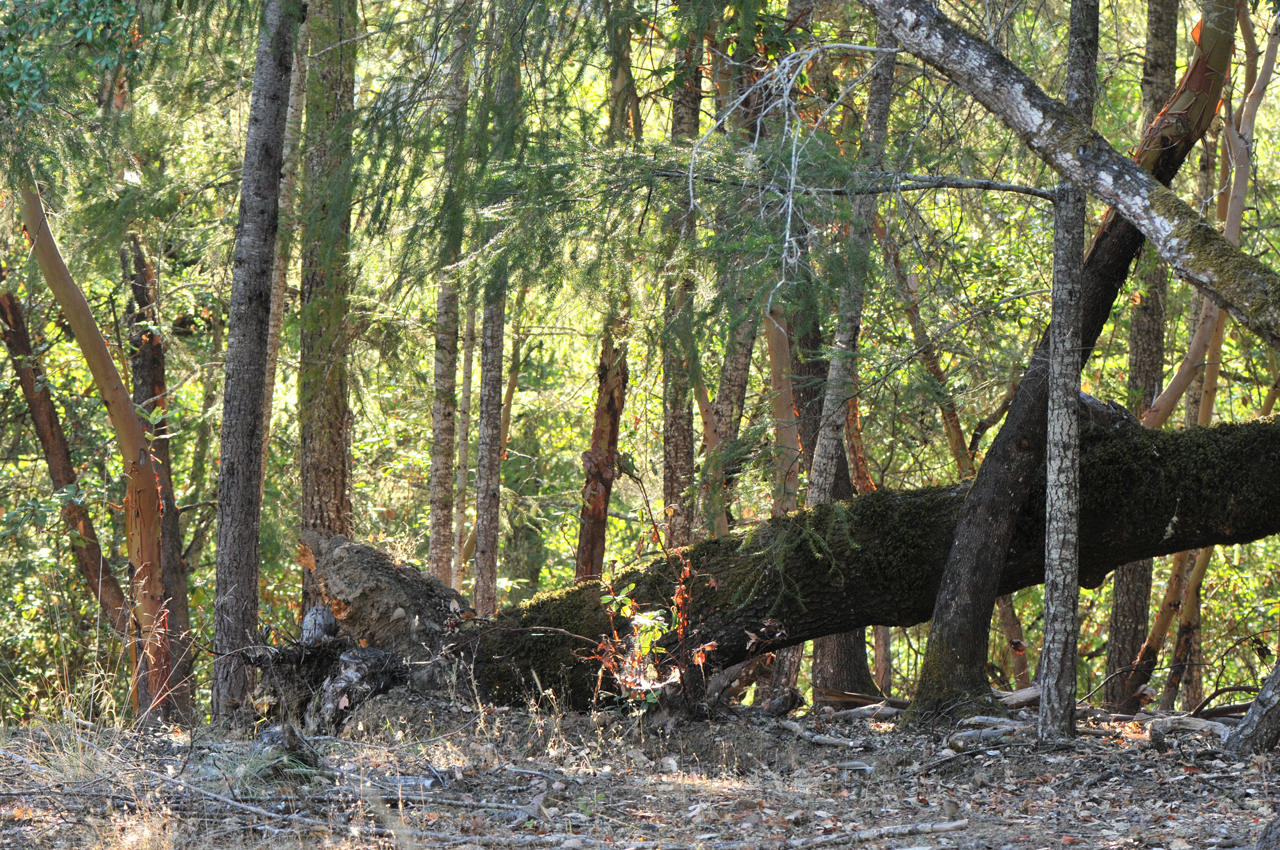
Focus Stacking 2a
Merge
Depth
of
Field with Photoshop CS4 - The first part did not work
to well (I had the same fuzzy edge problem), but the second
method does work well.Open multiple images in Photoshop CS4. Then open a new file. Drag from the layers pane of each image into the new file. You can close all the source files now.
Select all the layers in the new file and: Edit Auto-Align Layers.
Then Edit Auto-Blend Layers using the Stack Mode with a check in the box for Blend seamless Tones & Colors.
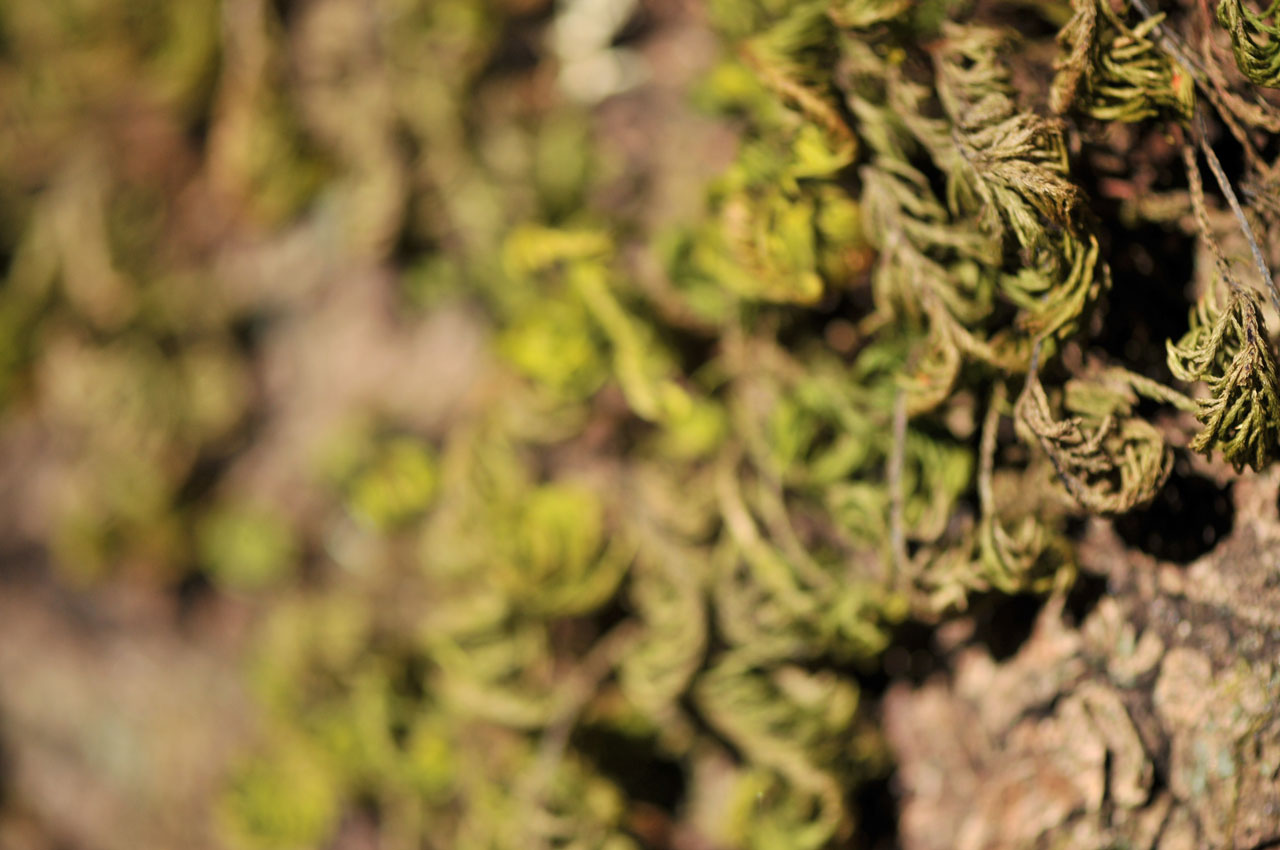
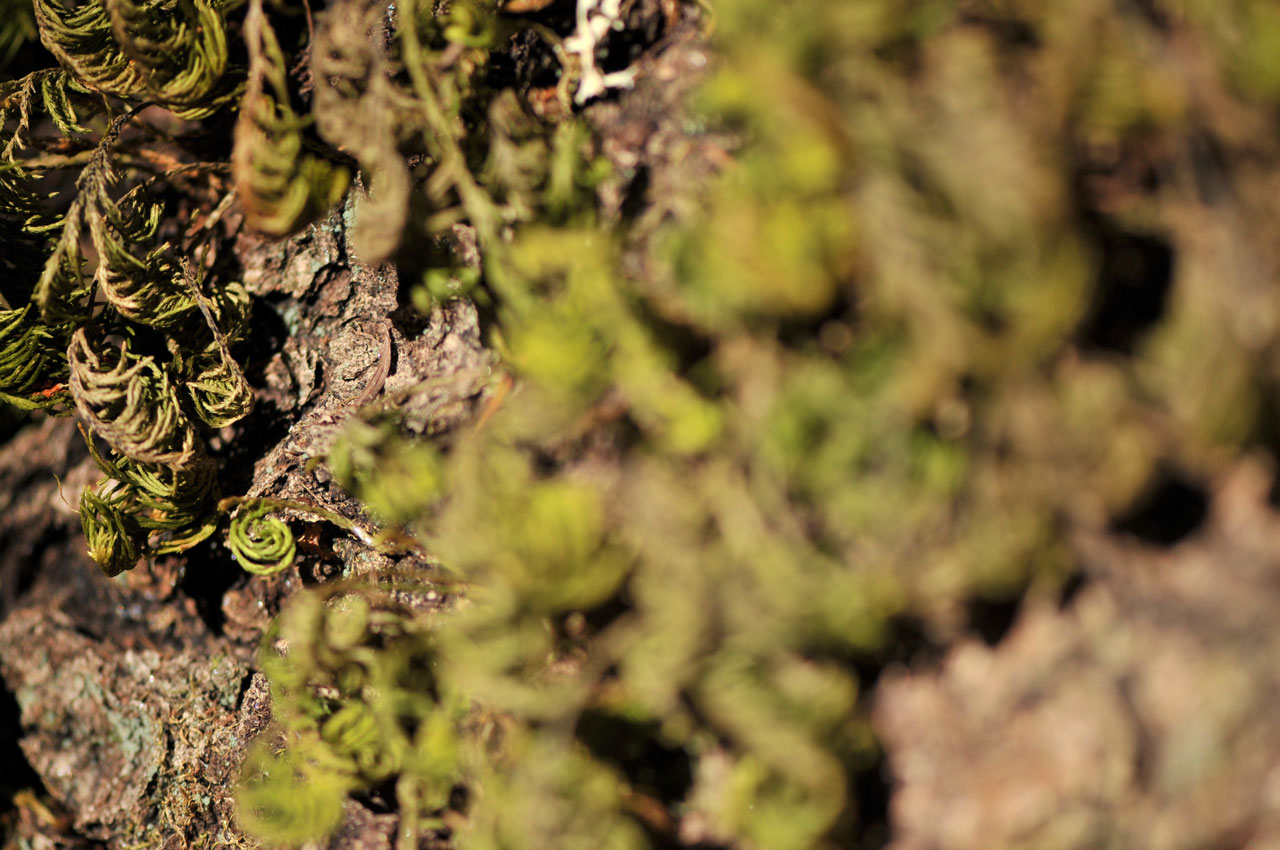
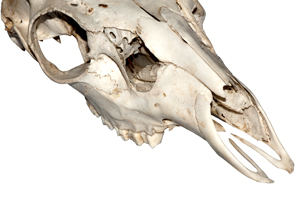
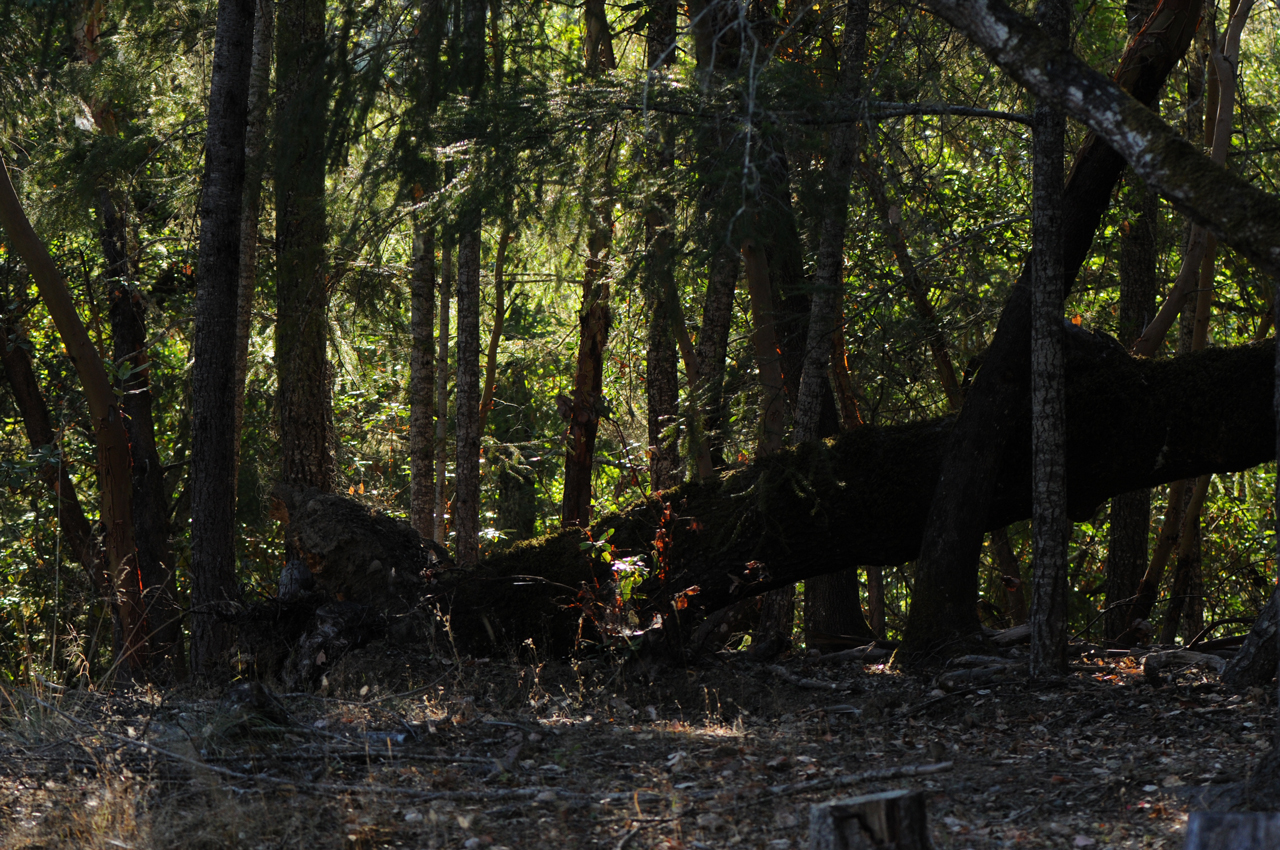
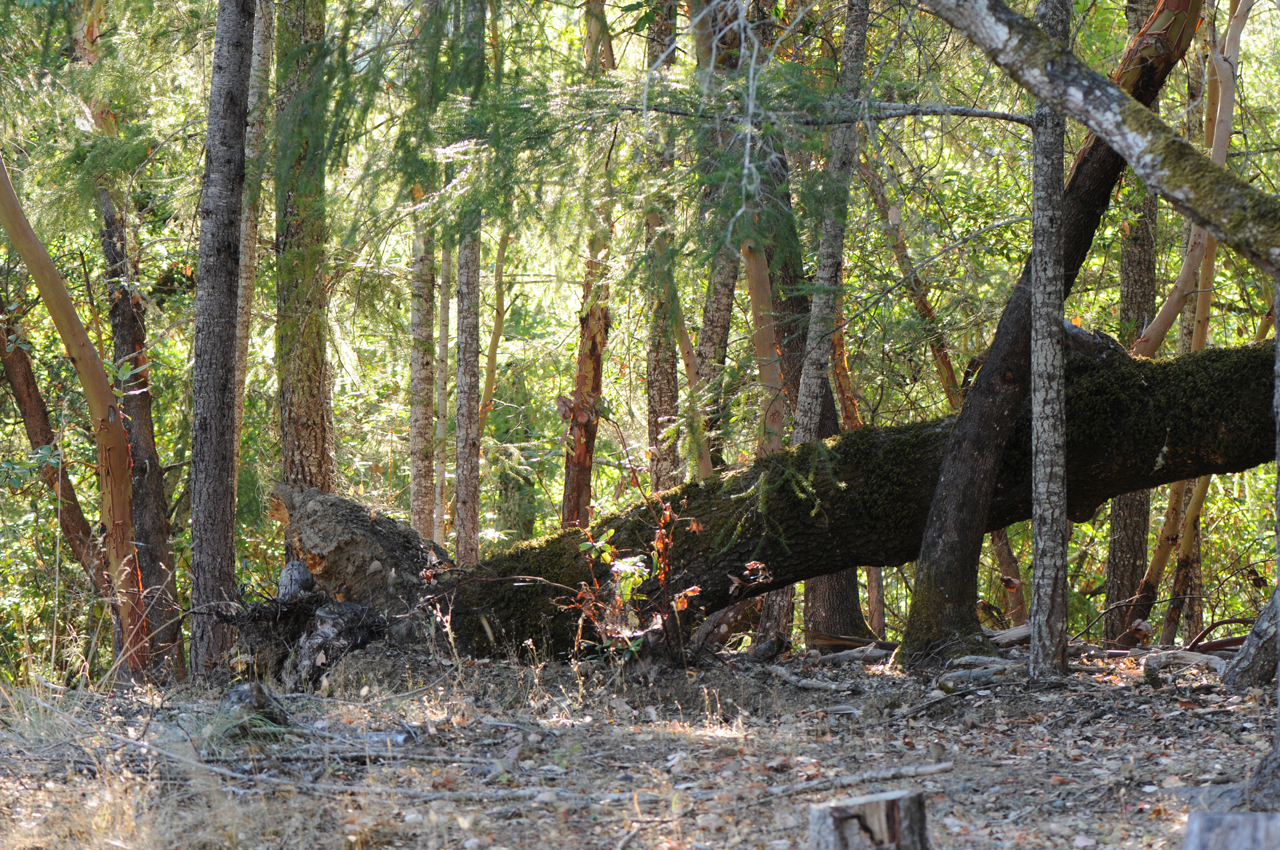
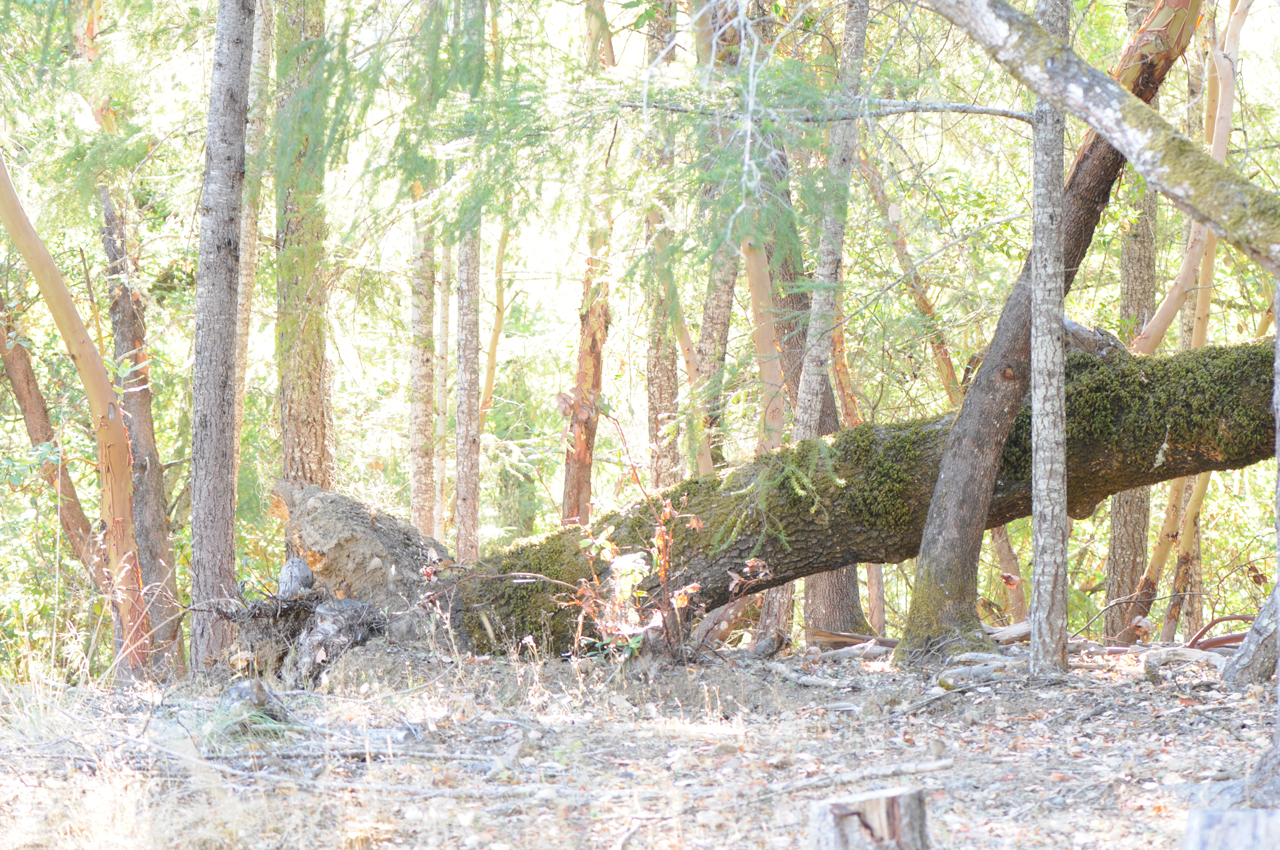
Note that a three dimensional subject will require a number of overlapping photos (tiles) that will be combined at the end of the process using just the Edit \ Auto-Align Layers. (If you use Edit Auto-Blend the background will be different for each tile.) Prior to that step each tile is made up of a number of frames that have different focus settings (all other settings the same) and these are combined using first Edit Auto-Align then Edit Auto-Blend Layers. This results in a tile that is more in focus than any single exposure can be.
 3 frames
|
 4 frames
|
|
 2 frames
|
 3 frames
|
|
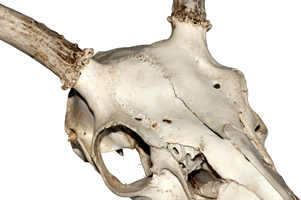 3 frames
|
 4 frames
|
|
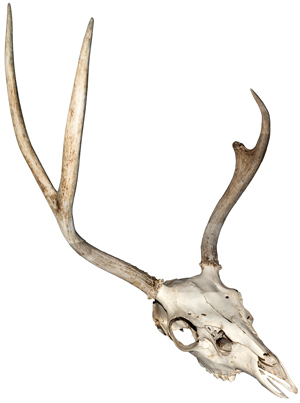 The perspective looks wrong. Camera on tripod and pan and tilt to cover subject. Would be better if the camera was translated for coverage and moved in/out for focus. The final image is 6921 x 10382 vs theory of 6000 x 9000 for a 20" x 30" print @ 300 PPI |
||
Single Frame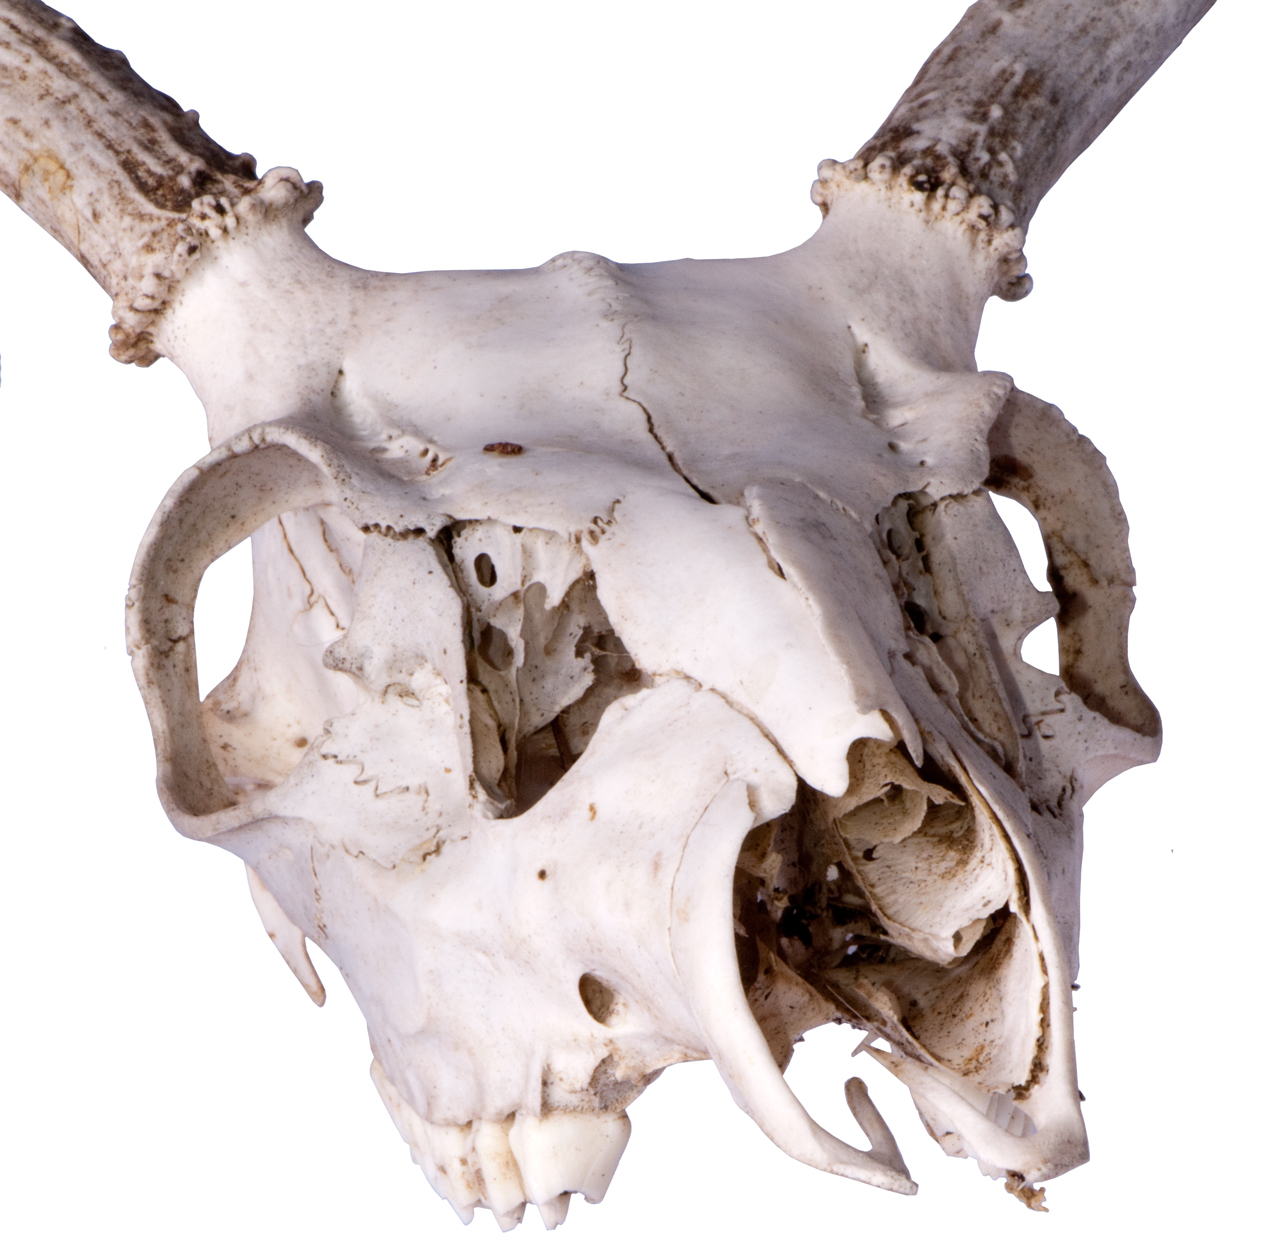 |
This opens up the idea of rather than stitching multiple tiles to get the needed resolution. You could do focus stacking where each image would be up sized to the final required resolution (9000x6000 for a 30 x20 print), then focus stacked. The idea is that the actual resolution would be improved. |
|
Focus Stacking 2b
----- In Adobe Camera Raw make adjustemets to all stack images at the same time ----
1-11) Select all the images in Windows file explorer (hold CTRL and click on each image file to be used in the stack) then OPEN
1-2) In Adobe Camera Raw use the SELECT ALL button at the upper left so you can work on them as a group
1-3) make any adjustments - I typically work down from the top starting with the exposure
(push to the right so specular highlights are blown out, push up the blacks and maybe add some fill light.)
1-4) Image \ Mode select 8bits/Channel (I have my camera set to 14 bits/Channel, so Adobe uses 16 bits/Channel (much larger file size)
1-5) SAVE AS and select .tif
1-6) OPEN IMAGE (will take you to Photoshop (CS4 or higher)
-------in Photoshop build the stack Note: each image will be a .tif file-----
2-1) Create a new image (File \ New ) which will hold the stack You can name it something appropriate for the combined image
2-1) Use Window \ Arrange and cascade, tile or whatever works for you so you see and access all the files for the stack.
2-3) Resize all the images so that you can select the full image easily
2-4) Open the Layers Panel
2-5) Click on the image frame (to start with the lowest numbered one, then in order)
2-6) Surround the image with the select tool (dotted rectangle) and <CTRL><C> to copy it to the clip board
2-7) Click on the new image frame
2-8) Click on it's layers panel (by clicking on the new image frame it's layers panel should be the active panel)
2-9) <CTRL><P> (to paste image into the stack
2-10) Click on the source image (selected in step (2-5) and delete it by clicking on the "X" in it's title bar
This is important because it frees up computer RAM
2-11) If all the source images have been used goto step (3-1)
2-12) select the next image
2-13) Goto step (2-6)
------Combine the stack into a single image ----
3-1) If you have plenty of RAM goto step (20)
19) Reduce the size of the stack images IMAGE \ Size can change the width in the pixels box.
One of the 7 images
used |
|
 |
Focus Stacking 3 - Non Adobe
StackShot - a motorized rail that advances the camera and trigers an exposureHelicon Focus stacking software
An Introduction to Focus Stacking — Extended Depth of Field Digital Photography by Rik Littlefield
Wiki -
An Introduction to Focus Stacking - changing the lens focus not as good as moving camera
Open-source Photographic Motion Control technology.
CombineZ
There are third party programs for focus stacking. A free program is CombineZ() As of 12 Oct 2011 it's CombineZP by Alan Hadley, prior versions were CombineZ5 and Combine ZM. The name is derived from Combining images that are stacked in the Z plane, i.e. X & Y are the left right planes and Z is the up and down plane. The author of the program uses it for taking photos of things like insects using a microscope.Zerene Stacker
Prices range from $40 to $290.Helicon Focus
Price range $30 to $350.Supports Trinamic PANdrive PD-110-42 & StackShot
Automated Camera Movement
Create An Automated Macro Rail For Image Stacking -Computer connection with USB.
Pat App 12/927,166 Motor controlled macro rail for close-up focus-stacking photography
Trinamic PANdrive PD-110-42 available from Semiconductor Store (California)
High Dynamic Range (HDR) Stacking
The idea is to take a series of shots covering under, normal and over exposure and then stack them to achieve a wider dynamic range of brightness.
Important NoticeInstead of using HDR methods, it's much better to
use RAW files from the camera. On the Nikon D300s the RAW image
contains 12 or 14 bits per color compared to the 8
bits per color that you get on all .jpg
images. That's a 6 bit (same as 6 f stops)
increase in dynamic range! For example when taking product photographs for my web pages it's common that you can not see into the shadows, but when Adobe Camera Raw (ACR) is used to process the RAW image moving the fill light slider allows seeing detail in the shadows. No need to take multiple exposures to cover the dynamic range. |
Adobe online CS4 Tutorial on HDR
Take photos for HDR images-
Secure the camera to a tripod.
-
Take enough photos to cover the full dynamic range of the scene. You can try taking at least five to seven photos, but you might need to take more exposures depending on the dynamic range of the scene. The minimum number of photos should be three.
-
Vary the shutter speed to create different exposures. Changing the aperture changes the depth of field in each exposure and can produce lower-quality results. Changing the ISO or aperture may also cause noise or vignetting in the image.
-
In general, don’t use your camera’s auto-bracket feature, because the exposure changes are usually too small.
-
The exposure differences between the photos should be one or two EV (exposure value) steps apart (equivalent to about one or two f‑stops apart).
-
Don’t vary the lighting; for instance, don’t use a flash in one exposure but not the next.
-
Make sure that nothing is moving in the scene. Exposure Merge works only with differently exposed images of the identical scene.
HDR images contain luminance levels that far exceed the luminance data that can be stored in 8‑ or 16‑bpc image files. You can make exposure and contrast corrections when converting a 32‑bpc HDR image to 8 or 16 bpc to produce an image with the dynamic range (tonal range) you want.
Example
The camera was pointed in the direction of the Sun, except it was level. The shooting position was choosen so that the lens was in total shade because of the trees.The nominal exposure was: 1/100, f/5 ISO500 105 mm tripod Nikon Active-D Lighting turned off.
| The focus is not as sharp as it could be. Need to colapse tripod, use Mirror Up and check focus by making a trial exposure and using the "+" to magnify the image on the LCD. Also using bracketing with Mirror Up should minimize the change for movement. |
 |
 |
 |
| 1/400, f/5 ISO500 105 mm
tripod Nikon Active-D Lighting turned off. |
1/100, f/5 ISO500 105 mm
tripod Nikon Active-D Lighting turned off. |
1/25, f/5 ISO500 105 mm
tripod Nikon Active-D Lighting turned off. |
 |
||
| 16 bit HDR image using
Exposure & Gamma reduction from 32 bit image |
In the Shooting Menu about 3/4 of the way down is Active-D Lighting. (Note: searching the Nikon manual for HDR will not work because they have their own name for it.) The possible settings are: Off, Low, Normal, High, Extra High, Auto. The example below was at Extra High.
So far I prefer the image using the internal Active-D Lighting over the stacked HDR method. That may be because I haven't perfected the method.
High Dynamic Range HDR in Nikon D300s Active-D Lighting set to Extra High
The focus is better than the stacked version above. Maybe allowing Photoshop CS4 to align the images rather than trust the tripod would improve the focus in the stacked HDR image?
Panorama, Stitching, Cylindrical & Spherical Image Stacking
Apple has what they call QuickTime VR (Virtual Reality or QTVR)(Wiki) where a number of photos, typically taken using a leveled tripod and an angle adapter are then combined into a single image that can be viewed on a computer and you can pan and tilt to see much more than a static frame. Google Street View uses something like this. The images can be combined either using a cylindrical or spherical model.
File \ Automatic \ Photomerge
Choose images to stitch together
Check the dot next to Reposition
OK
 |
Source was 6 portrait
images each a .tif file aobut 35 MB. Combined file 162 MB 6000 pixels wide x 2296 pixels high. The tripod was not leves so you can see a little vertical offset in each tile. This was the first experiment in looking for stars in the daytime. Notice that the top of the frame is darker, as it should be because as the elevation angle goes up (and toward the North star) the sky gets darker |
The Zenith is one of
the places that can be aimed at without a calibrated
mount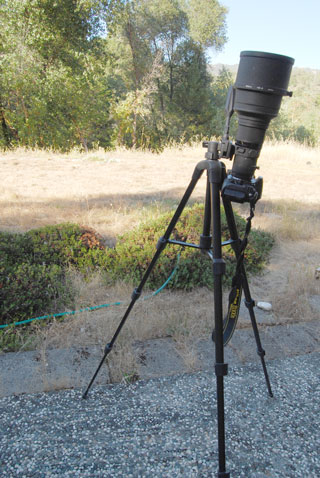 |
A 300 mm FL lens at
f/2.8 has an objective diameter of 300/2.8 = 107 mm or
4.21" dia. From the Visual Magnitude Equation 2 at: http://www.prc68.com/I/Mag.shtml Mag = 5 * Log10( D ) + 8.8 = 5 * 0.625 + 8.8 = 11.9 but this is for night time viewing. Who knows for daytime star viewing? |
Panoramic Hardware
GigaPan EPIC Pro - holds a DSLR camera and lens that can weigh up to 10 pounds and can take an almost spherical image (can not shoot straight up or down and limited by lens length) by means of stitching.Object Removal Stacking
Object Extraction
In Photoshop CS4 you need to download the ExtractionPlus Plug-In. It comes as a zip file. When the zip file is run it put the extracted files in a folder on my desktop named "Adobe CS4" but I didn't know that so it took an hour of expirmenting to find it. Once there work your way down through all the folders to the ExtractPlus.8BF filter. Another way would be to run the zip extraction program to get the .exe. Run the .exe then search your computer for ExtractPlus.8BF. Move it into the \Pluug-ins\Filters folder for your installation of photoshop CS4 (32 bit in my case WIN XP).In order to get Photoshop CS4 to show Extract in the Filters drop down box it was necessary to restart WIN XP. Now it's working.
Before you can use the history brush you must first enable history (which is a huge memory hog) under Edit \ Preferences \ General.
The history brush has an icon like the regular bursh plus is has a circular back arrow superimposed.
Object Removal
Based on this video. First the undesired objects are extracted from the image and replaced by black.In the Layers \ Smart Objects \ Stacking menu choose Maximum (since black is what we want to eliminate.
 |
 |
|
 |
 |
 |
Higher Resolution Stacking
Resolution Enhancement (Wiki: Super-resolution)
BlowUp
Works better than the photoshop bicubic methodworks on single image
$ 200
Fixer
Labs
Home ($ 30) - low cost for camera phones
SLR ($120) - 68 MP size limit, good for 23" by 33" @ 300DPI
XL ($200) - 2 GP size limit, good for 20"x23" @ 1000 DPI
Photo Acute
Recomended that a small motion be made between shots on a tripod.
They claim a doubling of resolution in each axis and so the minimum number of images is 4, but 5 or 6 images makes for a better result.
Includes HDR and noise reduction so using ISO in the 400 to 800 range is recomended.
When the camera and lens are one of the supported combinations, lens distortion can be corrected.
Removing moving objects is also an option.
Also does focus stacking.
Photographic Multishot Techniques (see below) covers using this software
Standard/Lite/Mobile ($30) - Compact and prosumer cameras & cell phones
Pro/Studio ($150) - DSLR + "
Perfect Size 7 (Genuine Fractals)
Standard Edition ($100) -
Blur Removal
Books & DVDs
Related
Digital Photography 202: Close-Up, Macro & Micro
Photography - about my experiences
Nikon - cameras and accessories
Ukiah - a number of photos