Making pdf Documents
© Brooke Clarke 2006 - 2007
Background
Scanning
Manual or Auto Feed
Bleed Through
File Format
File Naming
Dots Per Inch
Black & White, Gray scale or
Color
Frame Size
Scanning Blank Pages
Post Processing
Bleed Through
Portrait or Landscape
Angle Correction Rotation
Clean
Stitch
Vector Graphics
Adding Color
Acrobat Processing
Navigation
Bookmarks
What's wrong with most Bookmarks
Good Bookmarks
Links
OCR
Page Numbers
Cropping
Removing PDF/A
Photos
Links
Background
This came about because I wanted to
make
pdf versions of military and test
instrument Technical Manuals that range in size from dozens
to hundreds of pages. So here are some of the things I've
learned in the past few years. There are three main steps to
making a great manual. Scanning, Post Processing and Acrobat
processing. The following is based on the idea that a CD-ROM
or DVD will be used as the distribution medium, not an on line
document. When a document is to be on line the file size
needs to be minimized both to reduce the storage requirement and
to shorten the download time at the expense of quality.
Scanning
The first, but for most also
essentially the last, step is to scan the document.
Manual or Auto Feed
There are two kinds of scanners,
manual and auto feed. I use a manual flat bed scanner and it has
the advantage that when individual pages are scanned they are
aligned and not rotated. An auto feeder saves on labor, but
creates a number of problems. Since there needs to be some
clearance between the edges of the paper and the feed slot, say
it's 0.1 inches, then the paper can rotate by some small amount
(0.1"/8.5" = 0.6 degrees). 0.6 degrees is a very noticeable
amount of rotation and typically many pages have some
rotation. The feed rollers sometimes grab two sheets either
skipping a sheet, making some combination of two sheets, or
distorting a single sheet by smearing the letters.
Bleed through
When copying double sided sheets the back side image bleeds
through and shows up in the scan of the front side. The main
reason for bleed through is that the scanner lid has a white
lining. This is about as bad as a mirror and reflects light
back through the paper. In my opinion the lid should be
painted flat black, or what I do is tape a sheet of flat black
paper to the lid. Now light is only reflected by the front
of the page knocking the bleed through down a lot.
My HP 6200C ScanJet has a white surface under the lid. It
has died and HP AFAICT does no make a replacement scanner.
The Xerox 7600 flat bed scanner I'm now using has a flat black
surface under the lid.
Histogram
The four images below show what bleed through looks like on a
histogram. The upper left "Exposure Adjustment" window shows
the classical bleed through peak on the right. In the image
below it you can see the word "INDEX" in the bleed through.
The upper right "Exposure Adjustment" window shows the highlight
cursor has been moved from 233 to 169. 169 was choosen
because it's at the left toe of the bleed through curve. The
image below shows the output.
The only change made was to the highlight cursor. Both
images are the raw .bmp files directly from the HP 6200 scanner.
The next step in eliminating bleed through is to set the white
threshold using the histogram. On the
HP 6200C flat bed scanner, when
doing gray scale or color scans, you can adjust the black
threshold, white threshold and the gamma (plus stuff with the 3
color channels). The threshold controls are directly below
the histogram and move cursors on the histogram. So by
placing the white (right hand side) cursor just to the left of the
toe of the hump that's the bleed through you eliminate it
completely. Note this is a trade off since you are also
cutting out some of the highlight detail in the image.
Note that if the page is Black and White (no gray) then by
scanning it in gray scale and setting the scanner controls you can
completely eliminate bleed though. But it there is a
photograph or other gray scale on the page eliminating bleed
through and the quality of the image are a tradeoff and the
histogram gets to be very important.
When scanning a bound book insert a sheet of black paper behind
the page being scanned.
I tried the HP 8400 flat bed scanner and although they "show" a
histogram, there's no way it can be used as described above since
the controls were somewhere else and there were no cursors.
I turned it back and stuck with the 6200.
See
Post Processing Bleed Through below for
how to fix bleed through in an existing image file.
File Format
I expect that what most people do is scan in jpg or pdf
format. This is a mistake if you're going to do any post
processing since these are lossy formats and degrade each time
there's a new generation. A non lossy format like Bit Map
(.bmp) is a better choice to maintain high quality. Bit map
also includes the physical size of the image which is not the case
with Tagged Image Format (TIF).
File Naming
When working with hundreds of pages there will be mistakes and you
will need to rescan a page or two. So it's a very good idea
if your file naming scheme somehow will allow you match to the
actual book. Most of the TMs that I scan use a chapter-page
system where the first page in chapter 4 is called 4-1.
Also the file name should be such that the computer file manager
will alphabetize them into the same order that they appear in the
book. Otherwise you will need to do a lot of manual work to
get the pages in order.
The answer for me has been a file name like nnn-mmm.bmp.
Where nnn is the chapter number starting with 000 for stuff prior
to chapter 1 and after the last chapter keep using the next
number, so if appendix A comes after chapter 9 then it's
010-mmm.bmp. Where mmm is the page number. Note nnn
and mmm are always say 3 digits so the front cover is 001-001, not
1-1. This is needed to keep the file sort order correct.
A schematic might be 004-037L.bmp for the left side and
004-037R.bmp for the right side. If there are more than two
scans you can use A, B, C etc. This way when making multiple
scans of what is really one page number you don't use up page
numbers that are needed for other actual pages. For a huge
book you may need to provide for a 4 digit page number like
nnn-mmmm.
When scanning you don't need to manually enter all of the file
name. When the save file button is pressed the default file
name is the last name stored and you can just place the cursor in
front of the digit that needs to be changed and type: delete, the
new digit, enter.
Dots Per Inch (DPI)
This has a lot to do with the source material. If the source
is line art or text made prior to laser printers then 300 DPI is
very good. But if there are schematic diagrams with very
small print size (like a C size drawing that has been photo
reduced by 4x) then 600 DPI is needed. Photos are discussed
separately.
Black & White, Gray scale or Color
If the source document has color then the scan should be in
color. When scanning very old books where the pages have
yellowed sometimes using color will make the post processing
easier. For everything else I use gray scale. Black
and White has an advantage when you are trying for the smallest
file size, but for me it's too much of a quality reduction.
Note that even though you are scanning a black and white document
you need gray scale so that when half a pixel sees black and the
other half sees white it can make a gray. If B&W was
used in this situation there would be a 1 pixel error either into
the black or into the white.
Frame Size
For most documents you can set the frame size to just a little
smaller than the page image then there will not be black
borders. When working with schematics it's good to expand
the frame size to capture as much of the schematic as possible so
that when stitching you will have more choice of where to place
the seam. But remember to put it back for text pages.
Scanning Blank Pages
Books are laid out so that new chapters always start on a right
side (odd numbered) page. This is a good thing to do for a
physical book since it allows thumbing for new chapters, but has
no advantage in an electronic only book. If making a pdf
where it's planned to print all of it then scanning blank pages
will maintain the odd page on the right concept.
Post Processing
This is where a number of things get
fixed and the advantages of an electronic manual start to show
up. This is done using a photo editing package like
Photoshop. These packages process image files and although
they can do some text that's not their main use.
Bleed Through
Recently I received images of pages scanned by someone else that
had noticeable bleed through on many pages. But in Photoshop
you can Image\Adjust\Levels and on the histogram move the right
cursor to the left so that it's on the toe of the bleed through
curve. Also moving the left cursor to the right makes
the blacks blacker and the whole page look better. This is
much better than trying to use the "magic wand" to get rid of the
bleed though. This works so well because the bleed through
is in the form of light gray images not the black images that are
desired.
June 2017 update: After scanning a page on the Xerox 7600 in
black & white mode directly into Photoshop the Image\Mode is
color. By changing the mode to grayscale then using
Image\Adjustments\Level to move the right hand slider to eliminate
bleed through the results are better than with the mode at
Color. But before doing this the page is rotated if needed
and cropped. Some erasing may be needed at the gutter.
Portrait or Landscape
In a hard bound book all the pages must be in the same
orientation, but that's not the case for a pdf document. So
if there's a diagram or table that's better viewed in landscape
mode the page should be rotated into landscape format. Note
that if the document is later printed Adobe will automatically
rotate it.
Angle Correction Rotation
If an auto feeder was used in any of the prior generations then
there will be pages with rotations typically less than 2 degrees
that will need to be rotated to within about 0.3 degrees of
true. 0.7 degrees is very noticeable and anything over 1
degree is really noticeable. If it's a schematic that's
going to be stitched all the pages need to be the same
rotation. This means that you can stitch a couple of pates
where they are both 0.6 degrees, but not if one is 0.0 and the
other is 0.6.
Clean
The idea is
erasing things that are not wanted. Binder and staple holes
are an example. Older copy processes have the tendency to
leave small black specks much like finely ground pepper.
Older books where the pages have yellowed have a grainy
background. If you have set the frame size too big or the
page got rotated there may be black borders that need to be
erased. Some copy machines leave streaks, like there was a
scratch on the drum. The fold lines on a schematic are
another thing that can be erased. A properly made scan of a
clean page may not need any cleaning. An antique book may
need an hour of cleaning for each page.
Sometimes rather than erasing to white you need to use a copy and
paste method, like for eliminating the binder holes in a color
cover sheet.
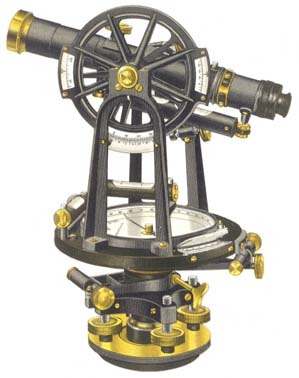
The image at the left comes from the
1928 K&E catalog.
Many hours of cleaning were required to get it looking like
this. The photo is a reduced resolution image, at full size
it's even more impressive. Note that like all the
illustrations in the catalog this is hand drawn using K&E
drafting supplies not a photo.
Stitch
Fold out pages need to be stitched together. This makes it
very easy to look at a schematic on the computer screen.
When a 2, 3 or 4 page fold out schematic is broken up into
seperate pages it's almost impossible to work with it on a
computer. What's most commonly done is to get out the tape
and scissors and make a hard copy.
Most schematics that were drawn prior to laser printers were done
either by hand or a plotting machine, but in either case there was
a pen or pencil used that could not draw anything finer than
about 0.3 mm. This is a much wider line than a laser printer
can draw. So if you have a schematic that's on a B (2 x
letter size) or C (4 x letter size) sheet you can stitch it
together. Do NOT shrink the page size, leave it as is since
the Adobe printing default will shrink the page to fit the
printer. This way the end user has the Adobe option to use
tiling (cut and tape) to get a full size print. There was a
time when photo reductions were used typically to move a drawing
to the next smaller sheet size. For these you need to go up
to 600 DPI when scanning to maintain the annotations.
When stitching you can place the stitch anywhere in the area where
both images overlap. Rather than just take all of the second
image it's good to look for a place where there's a minimal amount
of text that will cross the stitch. It's common that there's
a small scale and rotation difference between the two images that
are being joined so even if you pick a good stitch line you may
still need to determine where on the line the best match will
occur and as you go farther away the match gets poorer.
Vector Graphics
Line art, like schematics, can be
stored as either an image or vector file. Photoshop, Paint,
etc. are image processing programs. Autocad and the old HP
ME (Mechanical Engineering) are vector processing programs.
A vector based pdf "D" size drawing fits into a few hundred kilo
bytes, but if the same file with the same resolution is converted
to an image format it will be a few hundred Mega bytes, i.e. about
1,000 times larger. This was made real to me when making the
web page for the
HP E1938 OCXO where
the complete drawing package was very small as a vector pdf but
huge when done as an image file.
I haven't found a free image to vector converter
application. If you know of one please
let me know.
Often in schematics a box is drawn
around part of the circuit to define some function. Since
these lines look very similar to the trace lines they add
confusion. But they can be manually erased and replaced by
either a colored line or a gray line. Greatly adding to the
understanding of the circuit.
The trace lines can also be made much more understandable by doing
things like making all the ground lines wider and solid
black. The Vcc lines can be made red and the signal lines
some other color. This goes even further in making the
schematic easier to understand at a glance.
Some colors, like yellow, look good on the computer screen, but do
not show up when a page is printed. So when choosing colors
be sure they have at least 15% of red, blue and green components,
so there's some gray to print. Better is to make a trial
print to test each new color.
Acrobat Processing
In Acrobat 7 there is a "make pdf
from multiple files" option and a browse function. So if you
have the files named as described above it's just a few clicks and
you will have a single document that combines all the pages.
I put this step in the intro to the Acrobat processing sections
because it's just he beginning, not the end of what's needed.
Navigation
An electronic document is different from a physical document and
how you find what you want is different. You can not "thumb"
an electronic document like you can a book. But a book does
not have the instant access that you get with an electronic
document. When pages are numbered using the chapter-page
method there's no way to correlate that with the pdf document page
number.
Bookmarks
I think good bookmarks are by far the best way of
navigating a pdf document. A pdf document without
bookmarks is next to worthless for use at a computer, all
you can do is print it and use the hard copy, what a waste!
It's an art to name the bookmarks to keep them both short and
meaningful. Nesting folders is part of keeping the length
of the bookmark names short and also logically dividing the
document. For documents of about 25 pages and up bookmarks
make a world of difference in how easy it is to find something.
When the bookmarks are setup like the table of contents and List
of Illustrations and List of Tables (TOC, LOI and LOT) you have
all of these handy no matter what page you are on, just click on
the Bookmarks tab, open a folder or two and your on a new
page. It's very fast and convenient.
What's wrong
with most Bookmarks
I overlooked the use of bookmarks for some
time. Note that all the free TMs on LOGSA have bookmarks
and also note that they are useless. This means that when
you get a CD-ROM with a bunch of TMs it's also probably the case
that the bookmarks are useless. I think that someone that
knew about good bookmarks wrote the mil spec for how a TM is to
be made and the spec has a paragraph saying that there will be a
bookmark for each chapter, paragraph, figure, and table and sure
enough that's what they all have. The problem is that the
bookmark names are worthless. For example "Chapter 3" is
the name of the bookmark for "Ch 3 Operation" . The
bookmark name for a paragraph may be "Chapter 4- Section 3
-Paragraph 4.1.4". This has two problems, one - It does
not tell you what's in this paragraph and two it's too
long. Bookmarks are in a collapsible frame to the left of
the main page view frame. You can click on the "Bookmarks"
tab on the left to open them and you can click on the button at
the center of the divider bar(8 little bumps in bottom right of
the illustration) to close them. The divider bar can also
be grabbed and moved. So you can see that good bookmarks
both tell you what you will get when you click on them and also
are as short as possible.
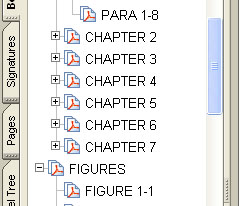
In the illustration they use "CHAPTER 1" instead of "Ch
1". All capitals is like someone is SHOUTING, not
pleasent. Also they use up 8 spaces when 4 work better.
Another problem with the LOGSA TMs is that the bookmarks depend
on a logical order for the paragraph numbers. If there's a
paragraph number typo caused by the OCR then then all the
bookmarks for the rest of that chapter are missing.
When someone makes a pdf document without bookmarks and then
locks out any changes, which includes the ability for the user
to add bookmarks, then they have really made a useless document.
Some vendors use pdf documents for their data sheets, which in
some cases are really books of 50 or more pages. I have
helped one change from using the worthless type of bookmark to
using better ones.
Good Bookmarks
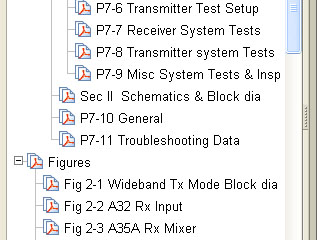
A good bookmark gives you a good idea of what you
will get if you click on it. It's also as short as
possible. Since bookmarks can be nested a good way to
eliminate the "Chapter 4- Section 3 -Paragraph 41.4" length
problem is to have a folder for "Ch 4 Maint" and a sub folder
for "DS Maint" and then have a bookmark for P4 "P4-Cal Adj" and
a sub bookmark for "P4.1 VFO" and a sub sub bookmark for P4.1.4
VFO Max Freq Adj". This way the folder a bookmark tells
you it's context. There can then be many bookmarks called
"Scope" but each is in a different section.
This is from TM11-5820-667-35 for the PRC-77. I think you
can see good bookmarks allow you to find what you want very
quickly.
Notice in the illustration "Sec II Schematics & Block dia".
By making a bookmark for each section all the indented bookmarks
under that section no longer need to carry any of the section
title thus making them shorter. Another example is where
there are a lot of bookmarks that all relate to the same item in
a longer list of different items. Adding a new
bookmark-folder allows removing the common name from all
the sub bookmarks, i.e. bookmarks are context sensitive and each
one does not need to spell out all the higher level names.
Under the Figures in the above illustration I should have
appended sch for schematics or blk for block diagrams.
Links
Links work like web page
links. They can be placed on about anything in a pdf
document. Most, not all, LOGSA manuals come with
links on the Table of Contents, List of Illustrations and List
of Tables entries, so you can use a conventional book navigation
approach. They also typically have links in the body of
the document whenever there's a reference to some other part of
the document. For example referenced to Figures are linked
as are references to other paragraphs. Some documents even
have every Index entry inked to the referenced pages. If
the bookmarks are good as described above there's less need for
links, but they are still very handy, i.e. one click and you're
at the linked page. And using the BIG back arrow (not the
previous page left arrow) you can go back to the page prior to
the link, making it easy to have a look at where the link is
pointing and then return.
OCR
Optical Character Recognition
allows different types of pdf documents. Most of, but not
all, the LOGSA documents have each letter of the text as a
letter. This not only allows searching the text but also
allows correcting typos. When an antique book is scanned
you can leave the image of the book to appear in the pdf
document and hide the OCR text behind the image. This
allows searching but you can not change the appearance.
Without bookmarks OCR allows finding things, but with a good set
of bookmarks it's not as important. With Acrobat 7
you can just click a button and add OCR for the whole document
(although it takes some time and memory).
I used Omni Page Pro 11 for some time. You have quite a
bit of control over what it does and the file format for the
output. The three main windows are a list of the source
pages, the active page being worked where it brings up
questionable conversions and asks for your input, and the output
window running the application suitable for the app, like
Word. One problem is that it may make a mistake and not
ask you what to do. Another is assigning different fonts
to similar text or making some text bold and some not.
Omni Page has ZERO on line support and the quality of the phone
support leaves something to be desired.
Acrobat 7 has built in OCR capability but I have not figured out
how to really use it. So far I just click and let it
run. But have not been able to exercise much control of
what it will do or correct what it has done. If you know
about Acrobat 7 OCR
let
me know.
Page Numbers
I don't use page number links
since good bookmarks work so well. If a document has poor
or non existent bookmarks, links or OCR then adding bookmarks
where the name and target is a page number would allow
translating a body text, TOC or Index reference to a page number
into a way to get to that page number. Note
typically there is NO way in an electronic document to get to
any given page number since the pdf file page number almost
never correlates with the number printed at the bottom of the
page.
Acrobat 9 Pro
There are some new features in 9 Pro
that are really nice. You can rotate a page or group of
pages and also Crop a page. Ofter when someone else has
scanned a document they do not rotate the pages so they can be
read at a computer. Note: the reader when printing has the
capability of rotating them back to match the paper i.e. landscape
or portrait both print correctly. This often has the effect
of adding a lot of white space around the image so cropping inside
Acrobat is very handy.
Autocad drawings can be made into pdf formats with different
flavors of pdf. The fancier version keeps the layers
separated and allows the reader to turn them on and off
individually.
Cropping
A bound book needs a "gutter" on
the edge where the pages are attached to each other to form the
back or spine of the book. There are also borders at the
top, bottom and outside edges. If the page is scanned and
all these white borders are included, when the page is displayed
on screen the print and images will be smaller than they would
be if the white space were cropped. All printers have a
minimum margin for each edge, so if the page is printed the
printers margins will be added to those on the page making the
printed text and images smaller than they were on the
origional. So cropping improves both the on screen and
hard copy versions of the document.
Removing PDF/A
Every now and then I get an old pdf document that was
saved in PDF/A and has no security, but I can not add
bookmarks. It's possible to remove the PDF/A formatting.
This web page worked for my Acrobat X Pro, but it talks about
other versions.
How
to Remove PDF/A Information from a file - I used the Remove PDFa Information Action (106K PDF)
method.
Once installed it shows up in Acrobat under Tools \ Action Wizzard
\ Remove PDF/a information.
Photos
An area where a electronic document
is very different from a printed one is the case of
photographs. A pdf document allows the user to change the
size of the displayed image. I find this very useful since
my reading vision is not as good as it once was, but it's
fantastic to be able to zoom in on a high resolution color photo
to the point that you are seeing macroscopic detail.
Taking a high resolution color
photo
takes some skill and is the subject of many books and college
level classes. When using a digital camera if at all
possible use the raw file format (the one that makes the largest
file size). Note that a color scanner can make a 30 Mega
byte file at only 300 DPI and HUGE files at higher DPI values like
600 or 1200. These provide macroscopic views or even
microscopic views when enlarged. You can see way more in one
of these images than you can with a magnifying glass.
I frequently see things in my photos that I did not see with my
eyes.
Making a high resolution color photo into a pdf does not result in
much file size reduction and may even make it larger, I feel it's
the right thing to do.
Links
Back to Brooke's Manuals Scanned by
Brooke, Home, Products for Sale web pages
[an error occurred while processing this directive] page created 22 May
2005.